2.5 Bra with cups
In this lesson we’ll see how to create patterns for bras with cups.
They can be done on blocks with zero or negative ease, but always with darts.
There are a lot of possibilities regarding the materials: we can use stretch or non- stretch fabrics. 4-ways stretch fabrics show some advantages: they do not wrinkle, sit closer to the body, are more comfortable, easy to wash and quite resistant. All fabrics used for underwear should be resistant to washing, swat and not pilling.
For bras, lining is also important as it prevents seam from being in touch with the body, so it makes the garment more comfortable. We prefer using natural fibers as lining.
Interlining is often added to side and band of the bra to stiffen them a bit and give more support.
To finish bras, it is possible to use lace trims, bias binding, fold-over elastic or other types of elastics, lace appliquè…
Now, let’s have an overview on bras.
Types of bra
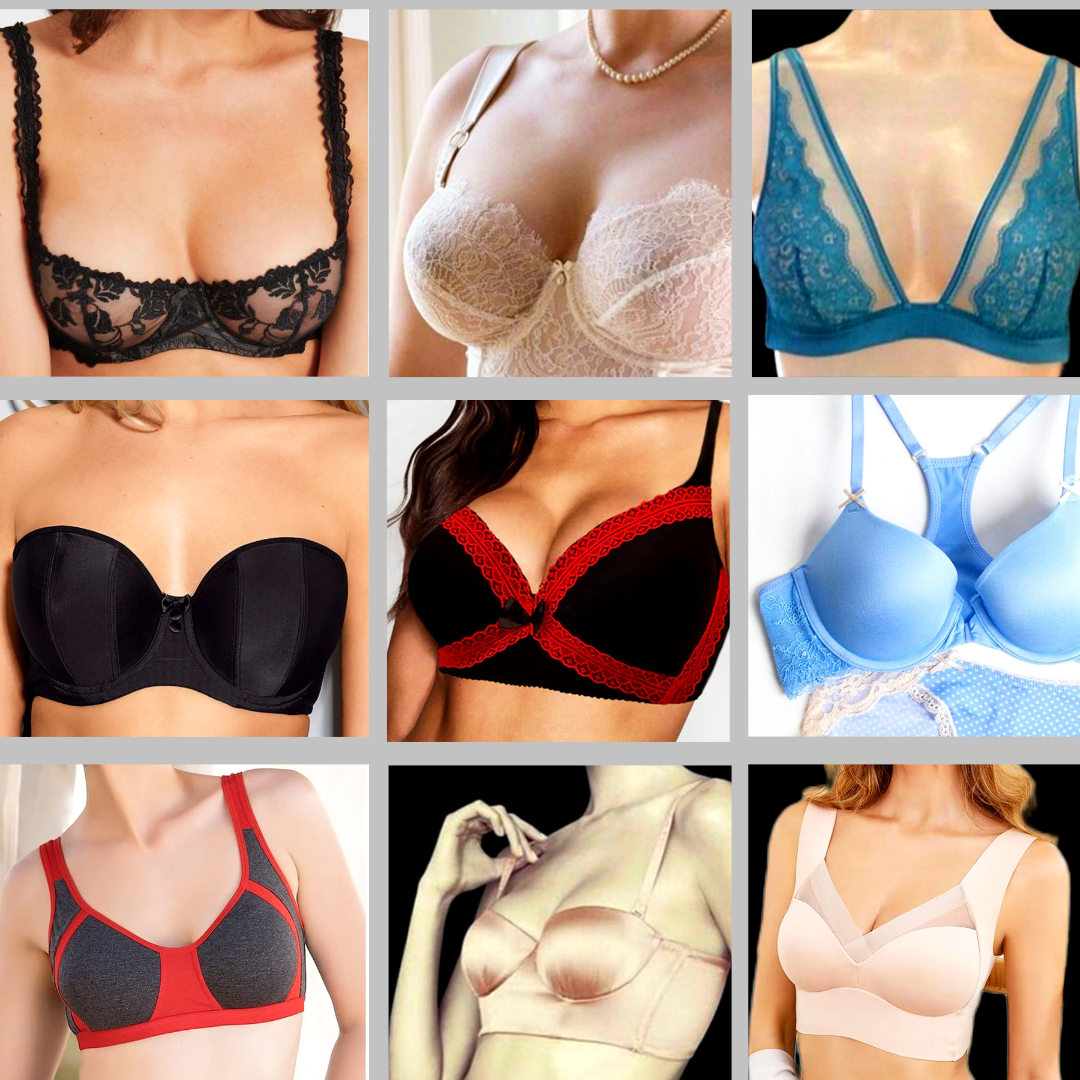
Bra type depends on the type of cups. The most common types are:
- demi-cup (black lace, first image up on the left), usually for smaller sizes, has a very small bridge in center front and very open neckline
- full cup, the very basic one, can be with underwires or without, with foam cups or soft ones
- triangle cup, does not shape the breasts but follows the natural shape, it is without underwire
- strapless, fits the chest thanks to the very tight underbust band and usually has silicone elastic that sticks a bit to the skin
- push up, highlights the breasts giving the illusion of one size more, can have small pockets for removable padding
- t-shirt bra, has no seams on foam cups and low center front neckline, the purpose is to be almost invisible with lightweight garments
- sport bra, as we saw in previous lesson, helps supporting and protecting breasts during sports
- balconette – shoulder straps are extremely on the sides and neckline is very open
- minimizer (last photo on bottom right), used for supporting big breasts – it combines power nets with wide shoulder straps to hold the weight and reduce back pain. Can also visually reduce the size of breasts
- nursing bra (not shown), has a detachable part on front for breastfeeding.
Anatomy of a bra
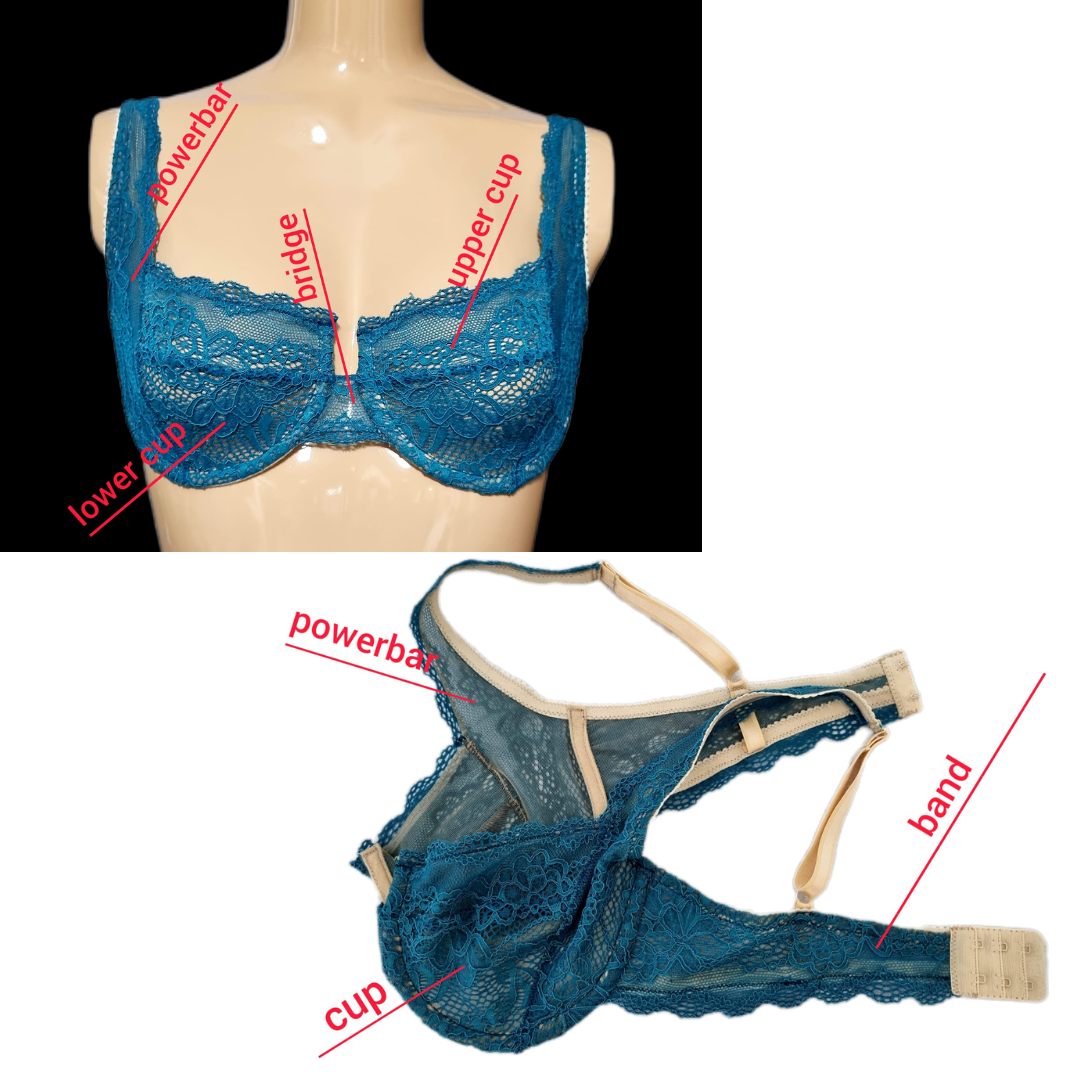
Every bra with cups is made of:
- cups, that can be soft (made of fabric only) or shaped with foam (bought ready or made out of foam fabric)
- bridge, the part connecting cups
- shoulder straps (or power bars for maximum support)
- back closure (usually hook&eye)
- underwire with its case in most of the bras
- side bone in most of bras.
Different shapes
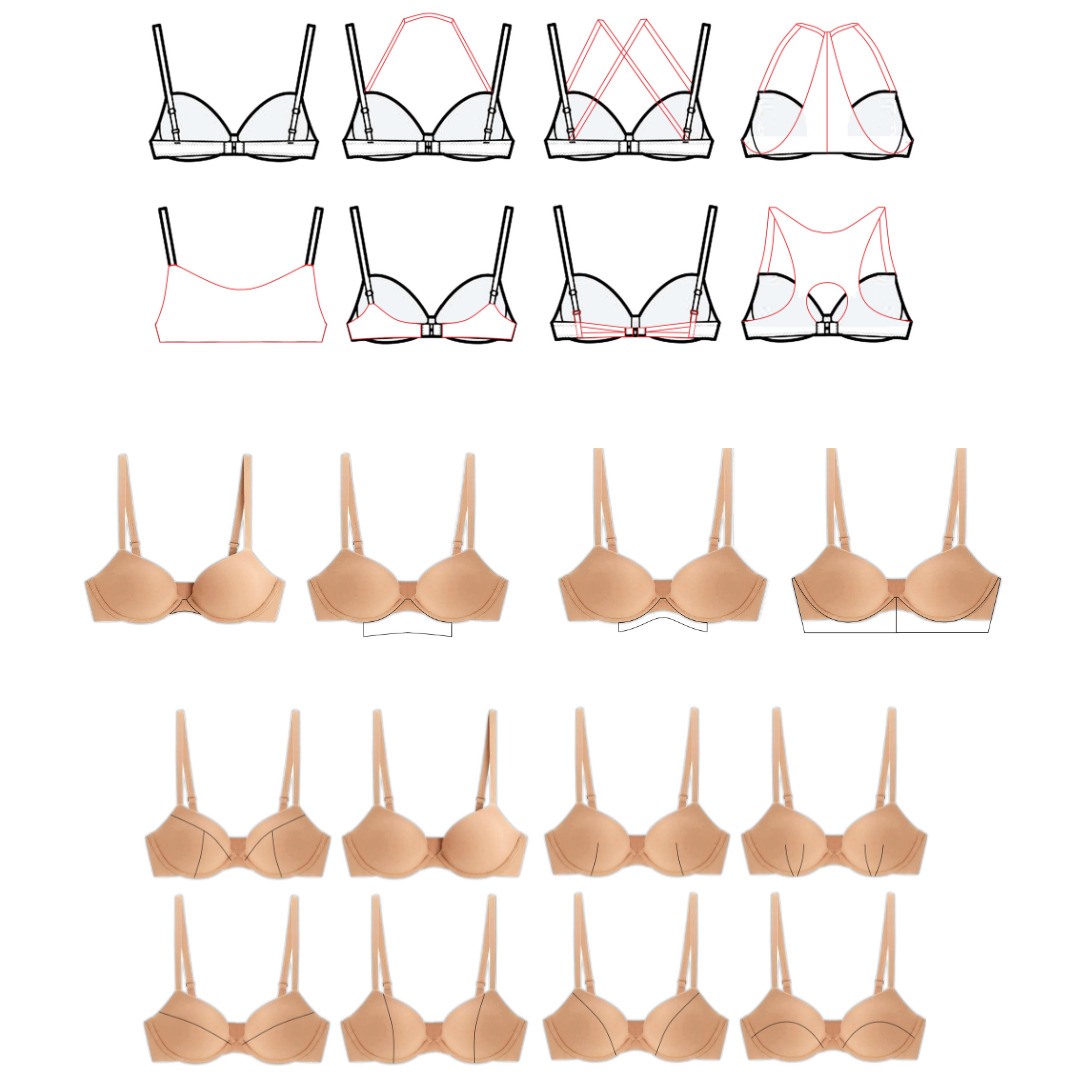
The first image shows different back shapes: the main points are support, comfort and aesthetic.
Back closure width and shoulder strap width change according to sizes: a single hook and 0,8cm shoulder strap offer way less support than 3 or 4 hooks and 2cm straps.
In second photo we highlighted the bridge shape that links cups – it can change according to bra type and cup shape. As said before, a wider bridge offers more support, so is more suitable especially for bigger cups. In smaller cups, bridge can become a small bar.
The third image shows different possible stylelines on cup.
The 3-pieces cup is the most similar to anatomic shape and is suitable for all sizes.
Other possibilities are cups with no cut (shaped in industry with heat), cups with one or multiple darts, cups made up of 2 pieces (either with horizontal or vertical cut), cups with diagonal or curved pieces.
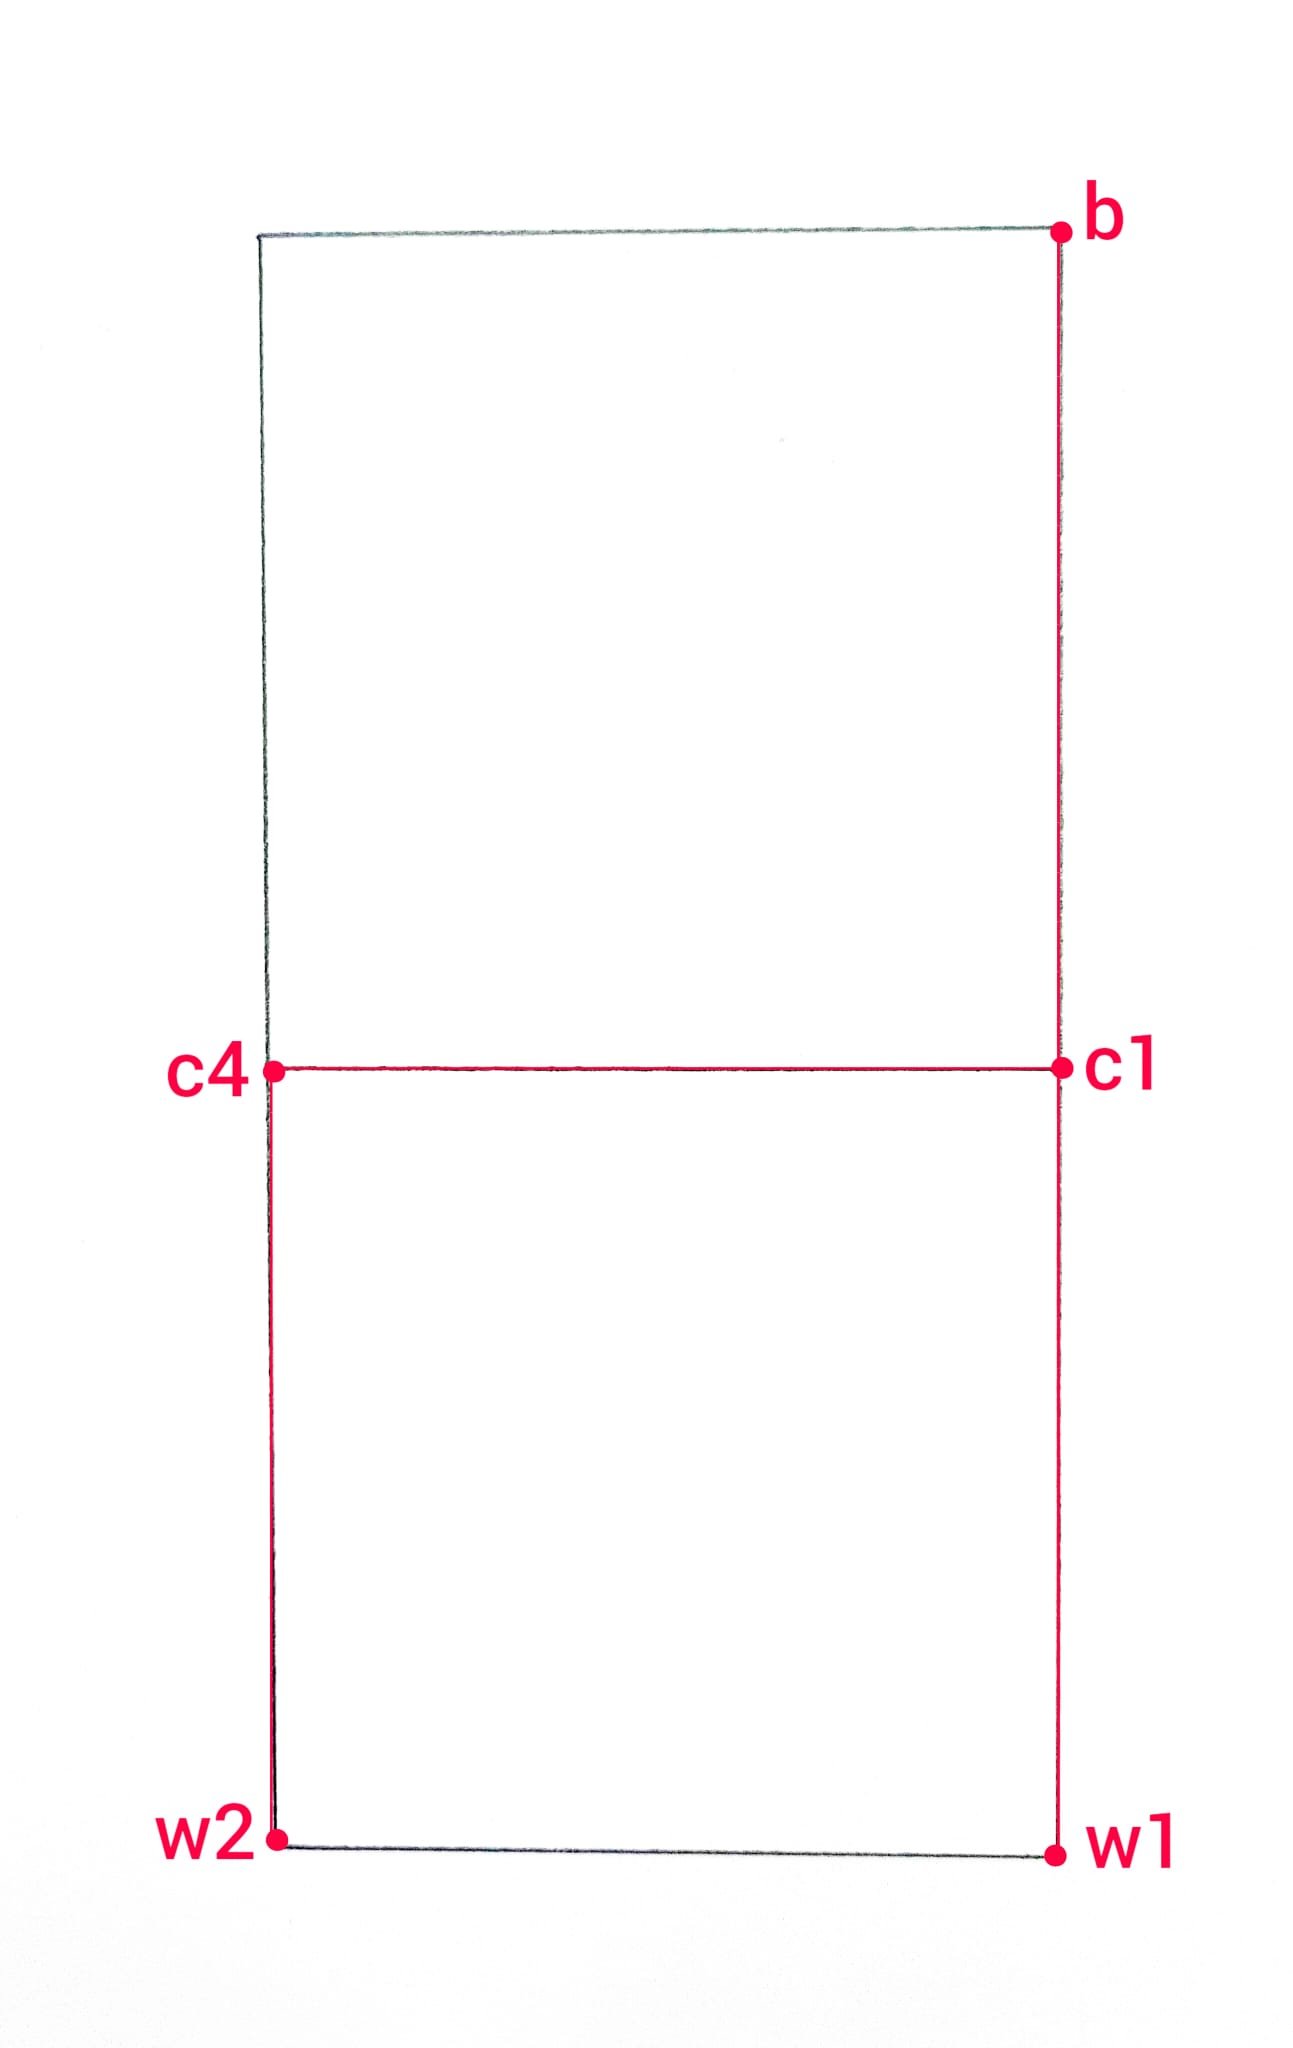
Front foundation chart
For bras with cups, we start by drawing front.
Draw a line on right side of the sheet, this in center front. Square left from upper point and label it b.
b-w1 = side back waist length (meas. n. 10)
b-c1 = bust circ/6 +8cm
c1-c4 = bust circ/4
From point c4, square up and down a perpendicular to c1-c4 creating a line that is parallel to center front.
Square left from w1 and label w2 the point where it intersects the new vertical line.
c4-w2 is side front.
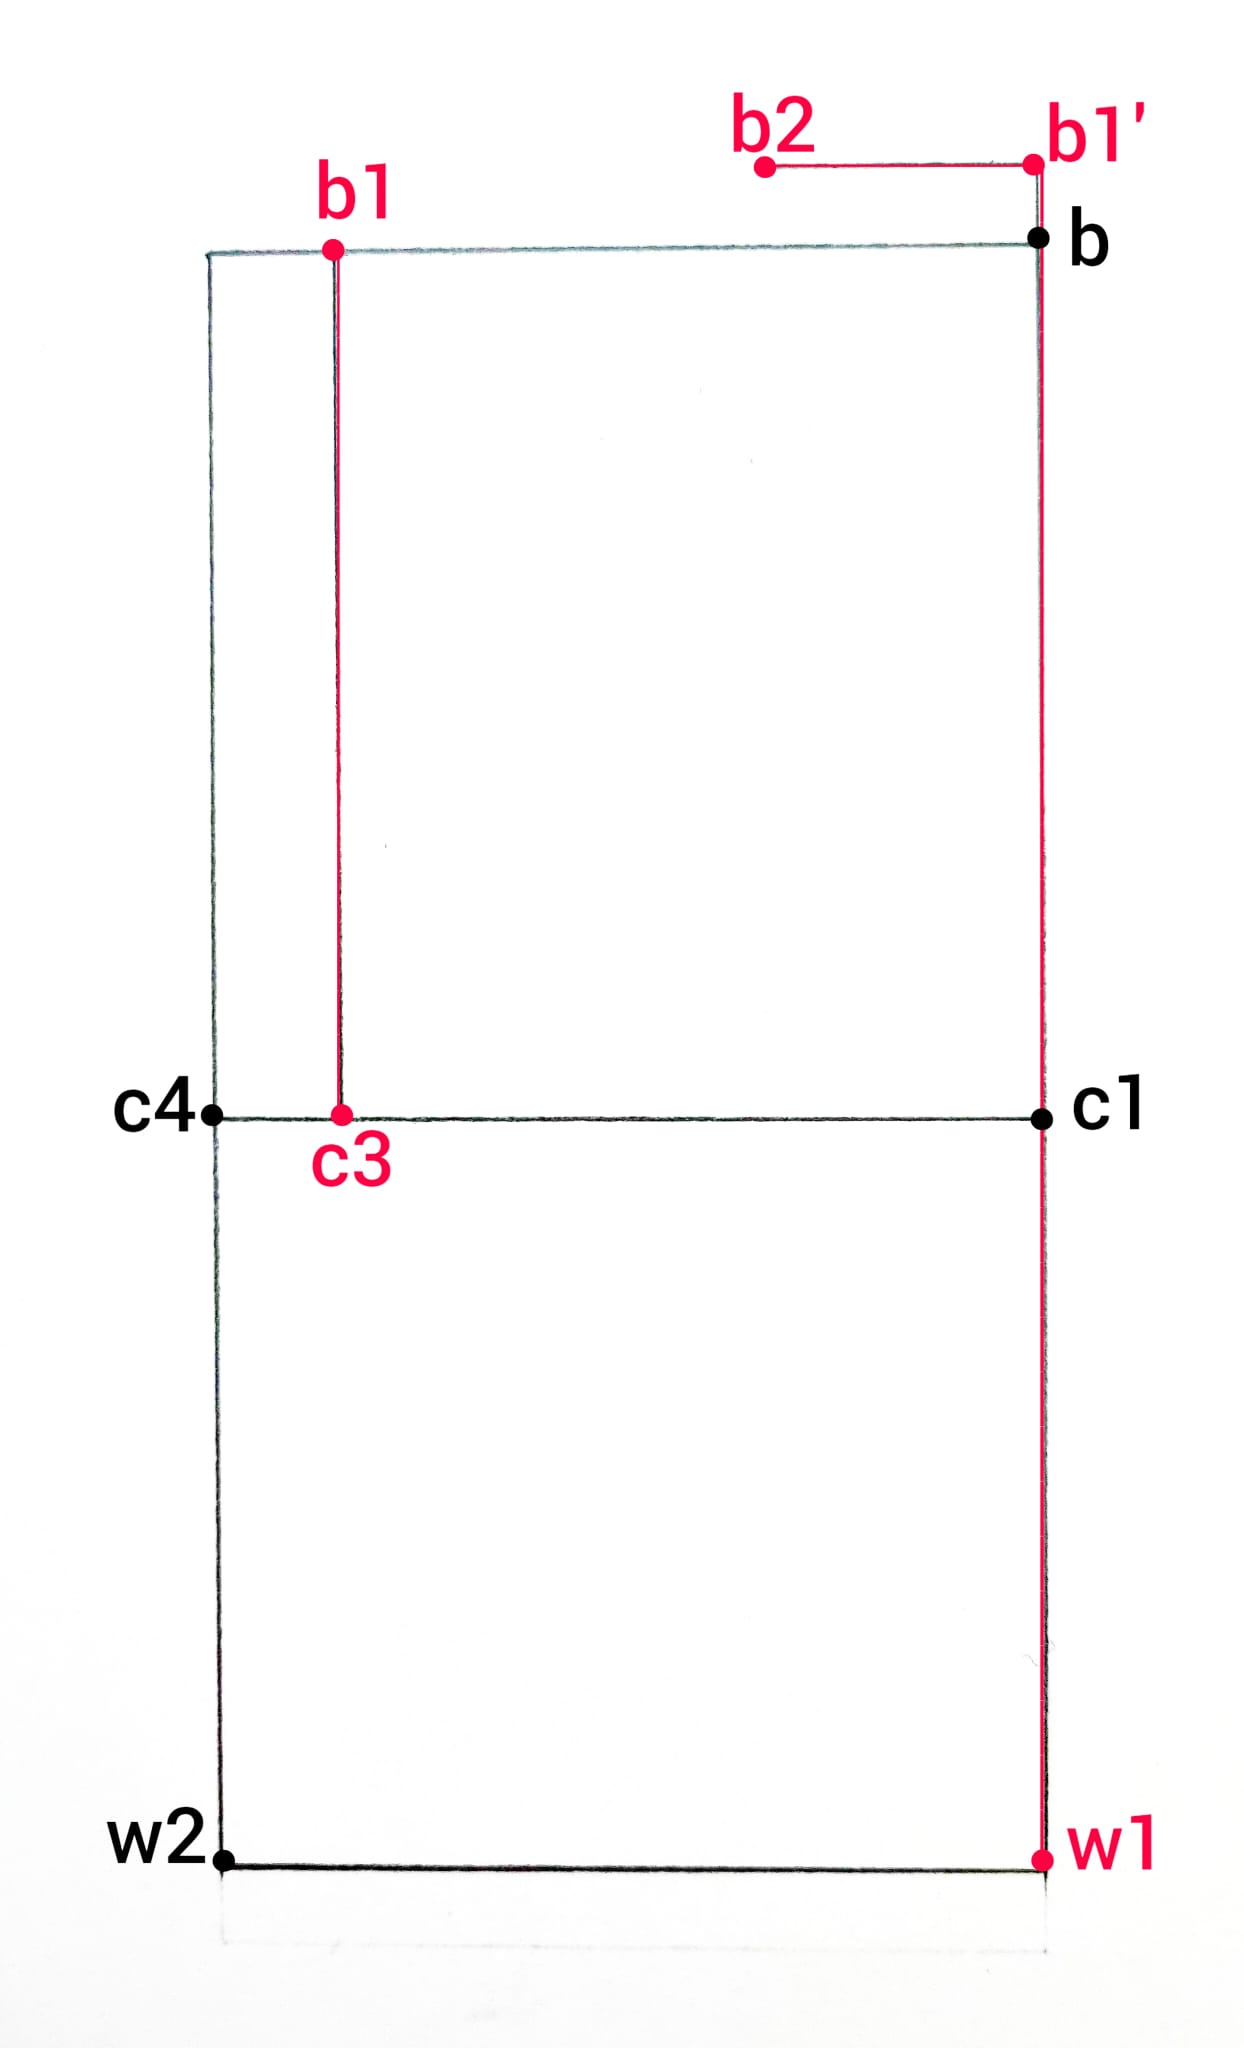
Front foundation chart
w1-b1′ = front waist length (meas. n. 6)
b1′-b2 = bust circ/12
b-b1 = across front/2 (meas. n. 15)
From point b1 drop a perpendicular to reach line c4-c1.
Label c3 this point. Join points b1 to c3.
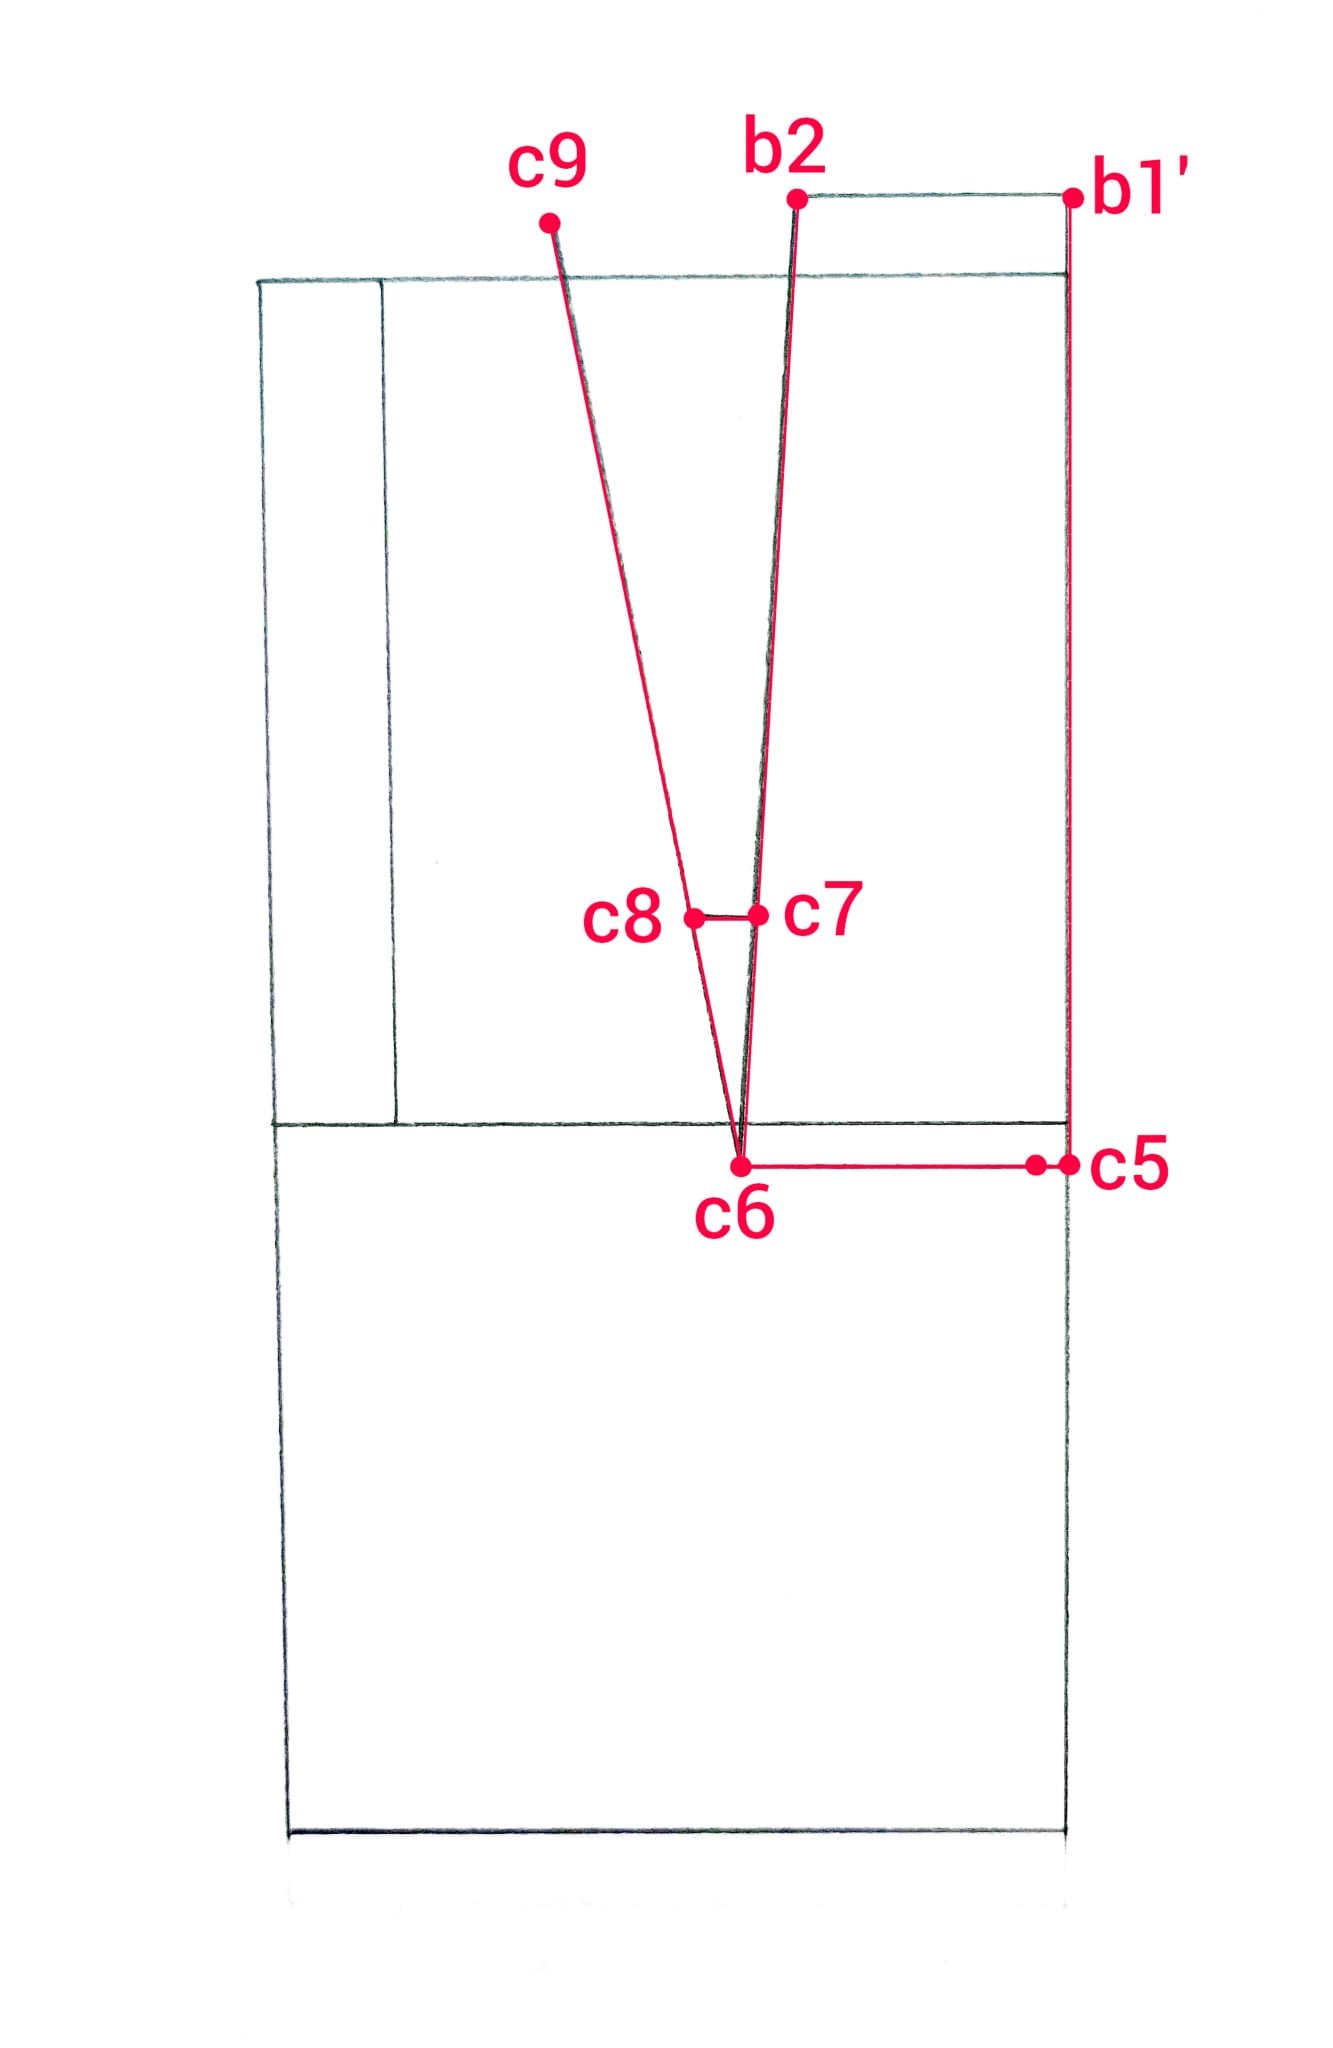
Shoulder dart construction
b1′-c5 = bust height (meas. n.7)
c5-c6 = breast distance/2 (meas. n.8)
Join points b2 to c6 with a straight line: this is one dart leg.
c6-c7 = breast distance/2 -2cm
c7-c8 = (bust circ-chest circ)/2
Draw a new line from c6 passing through point c8 and whose length matches b2 to c6 measurement. Mark the new point as c9.
c6-c9 is the second leg of shoulder dart.
Cup construction
Draw a circle whose center is c6 and radius is as (c5-c6) -1cm
Label c10 and c5′ the points where the circle intersect the horizontal line passing through c6.
Square down from c6 to waistline and label the point w3.
Square out 1,5cm on each side and label points w4 and w5.
From these points, raise perpendicular to waistline to the circle and label the points where lines hit the circle w6 and w7.
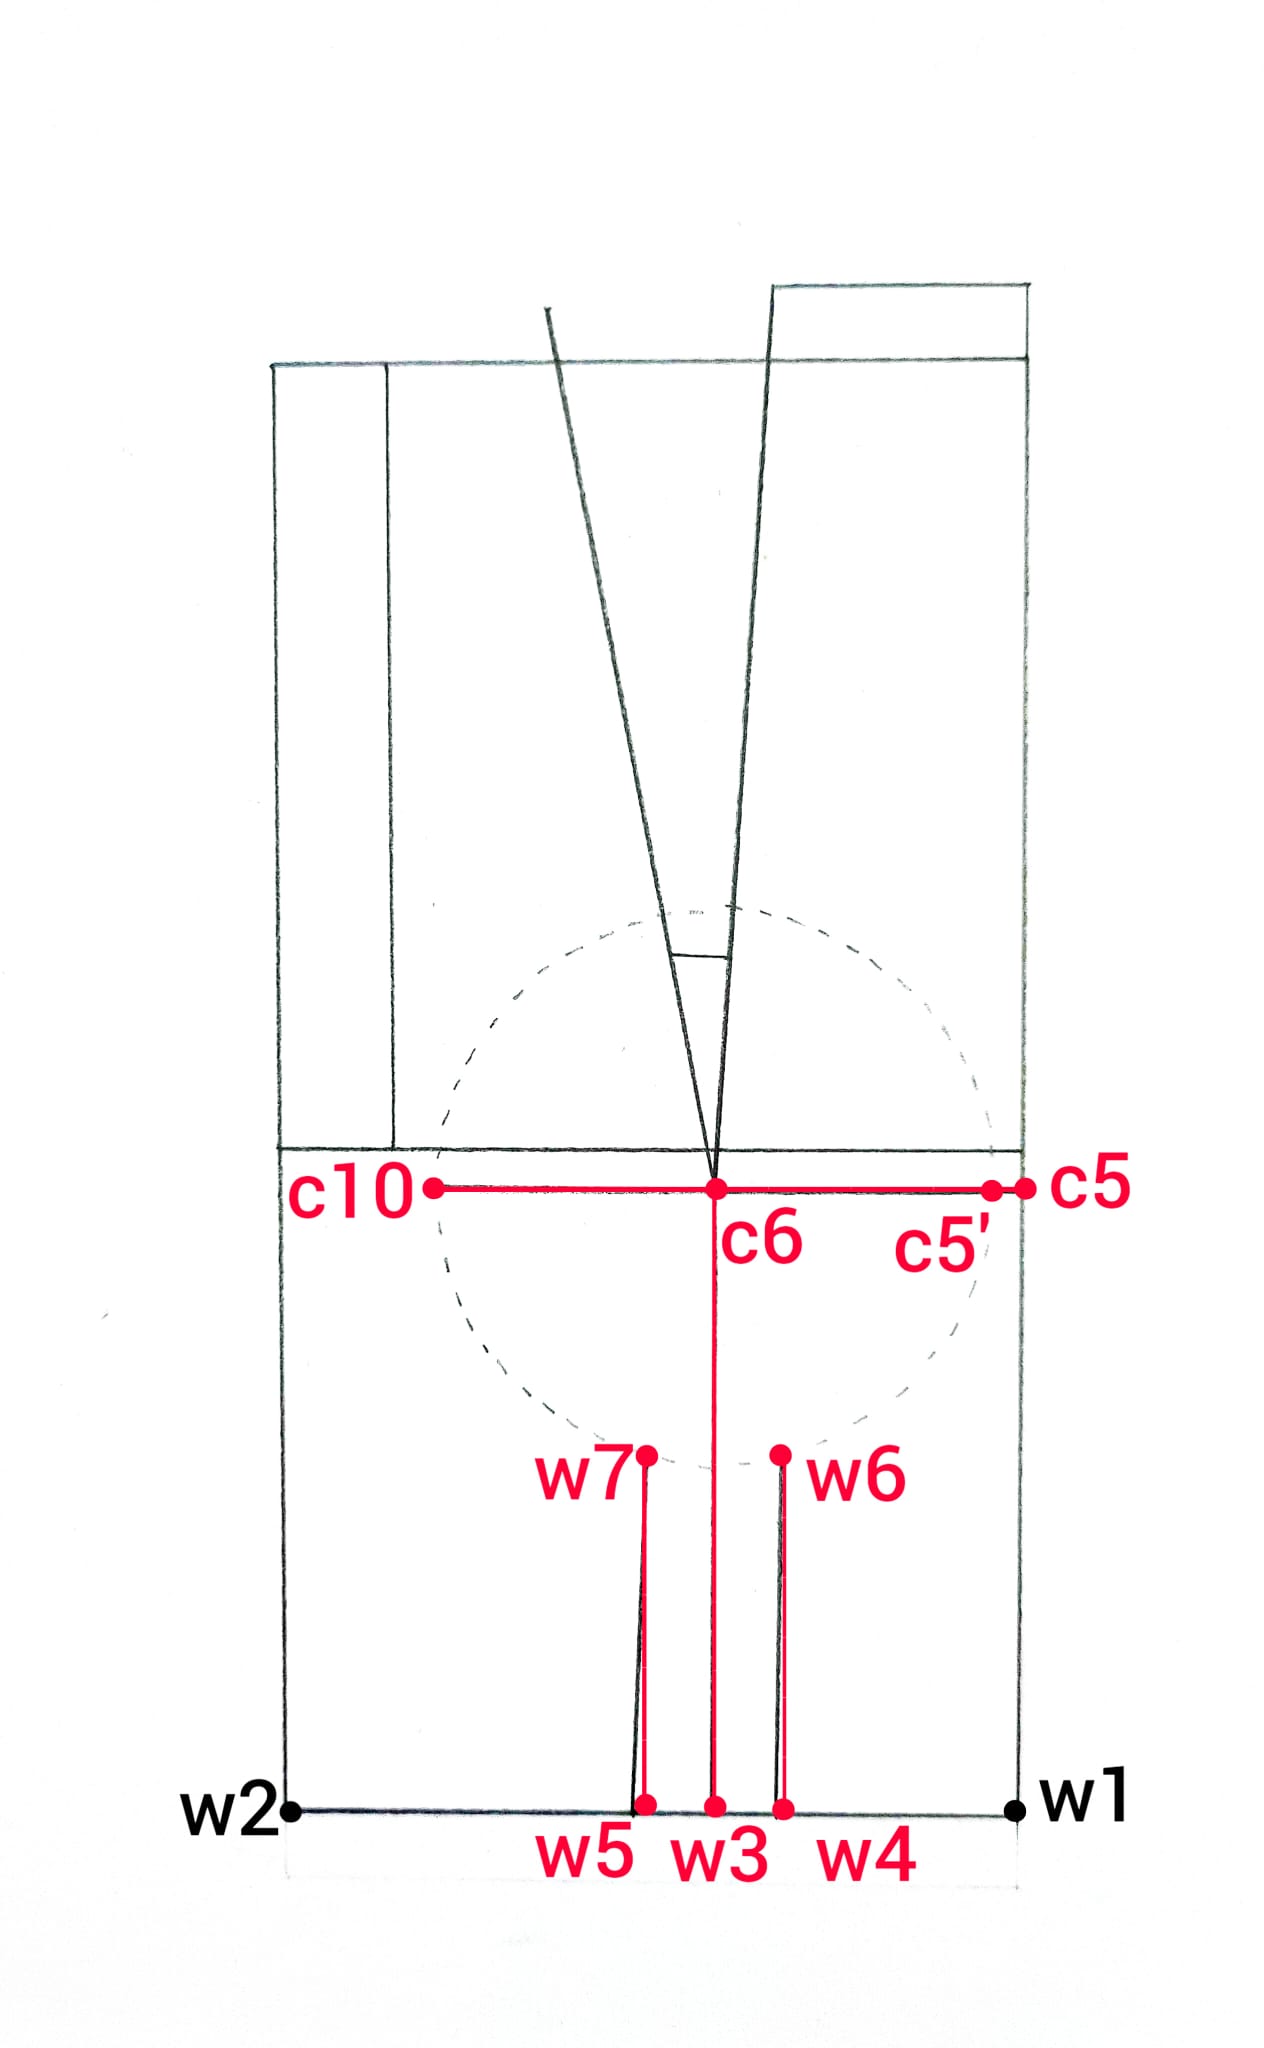
Cup and band construction
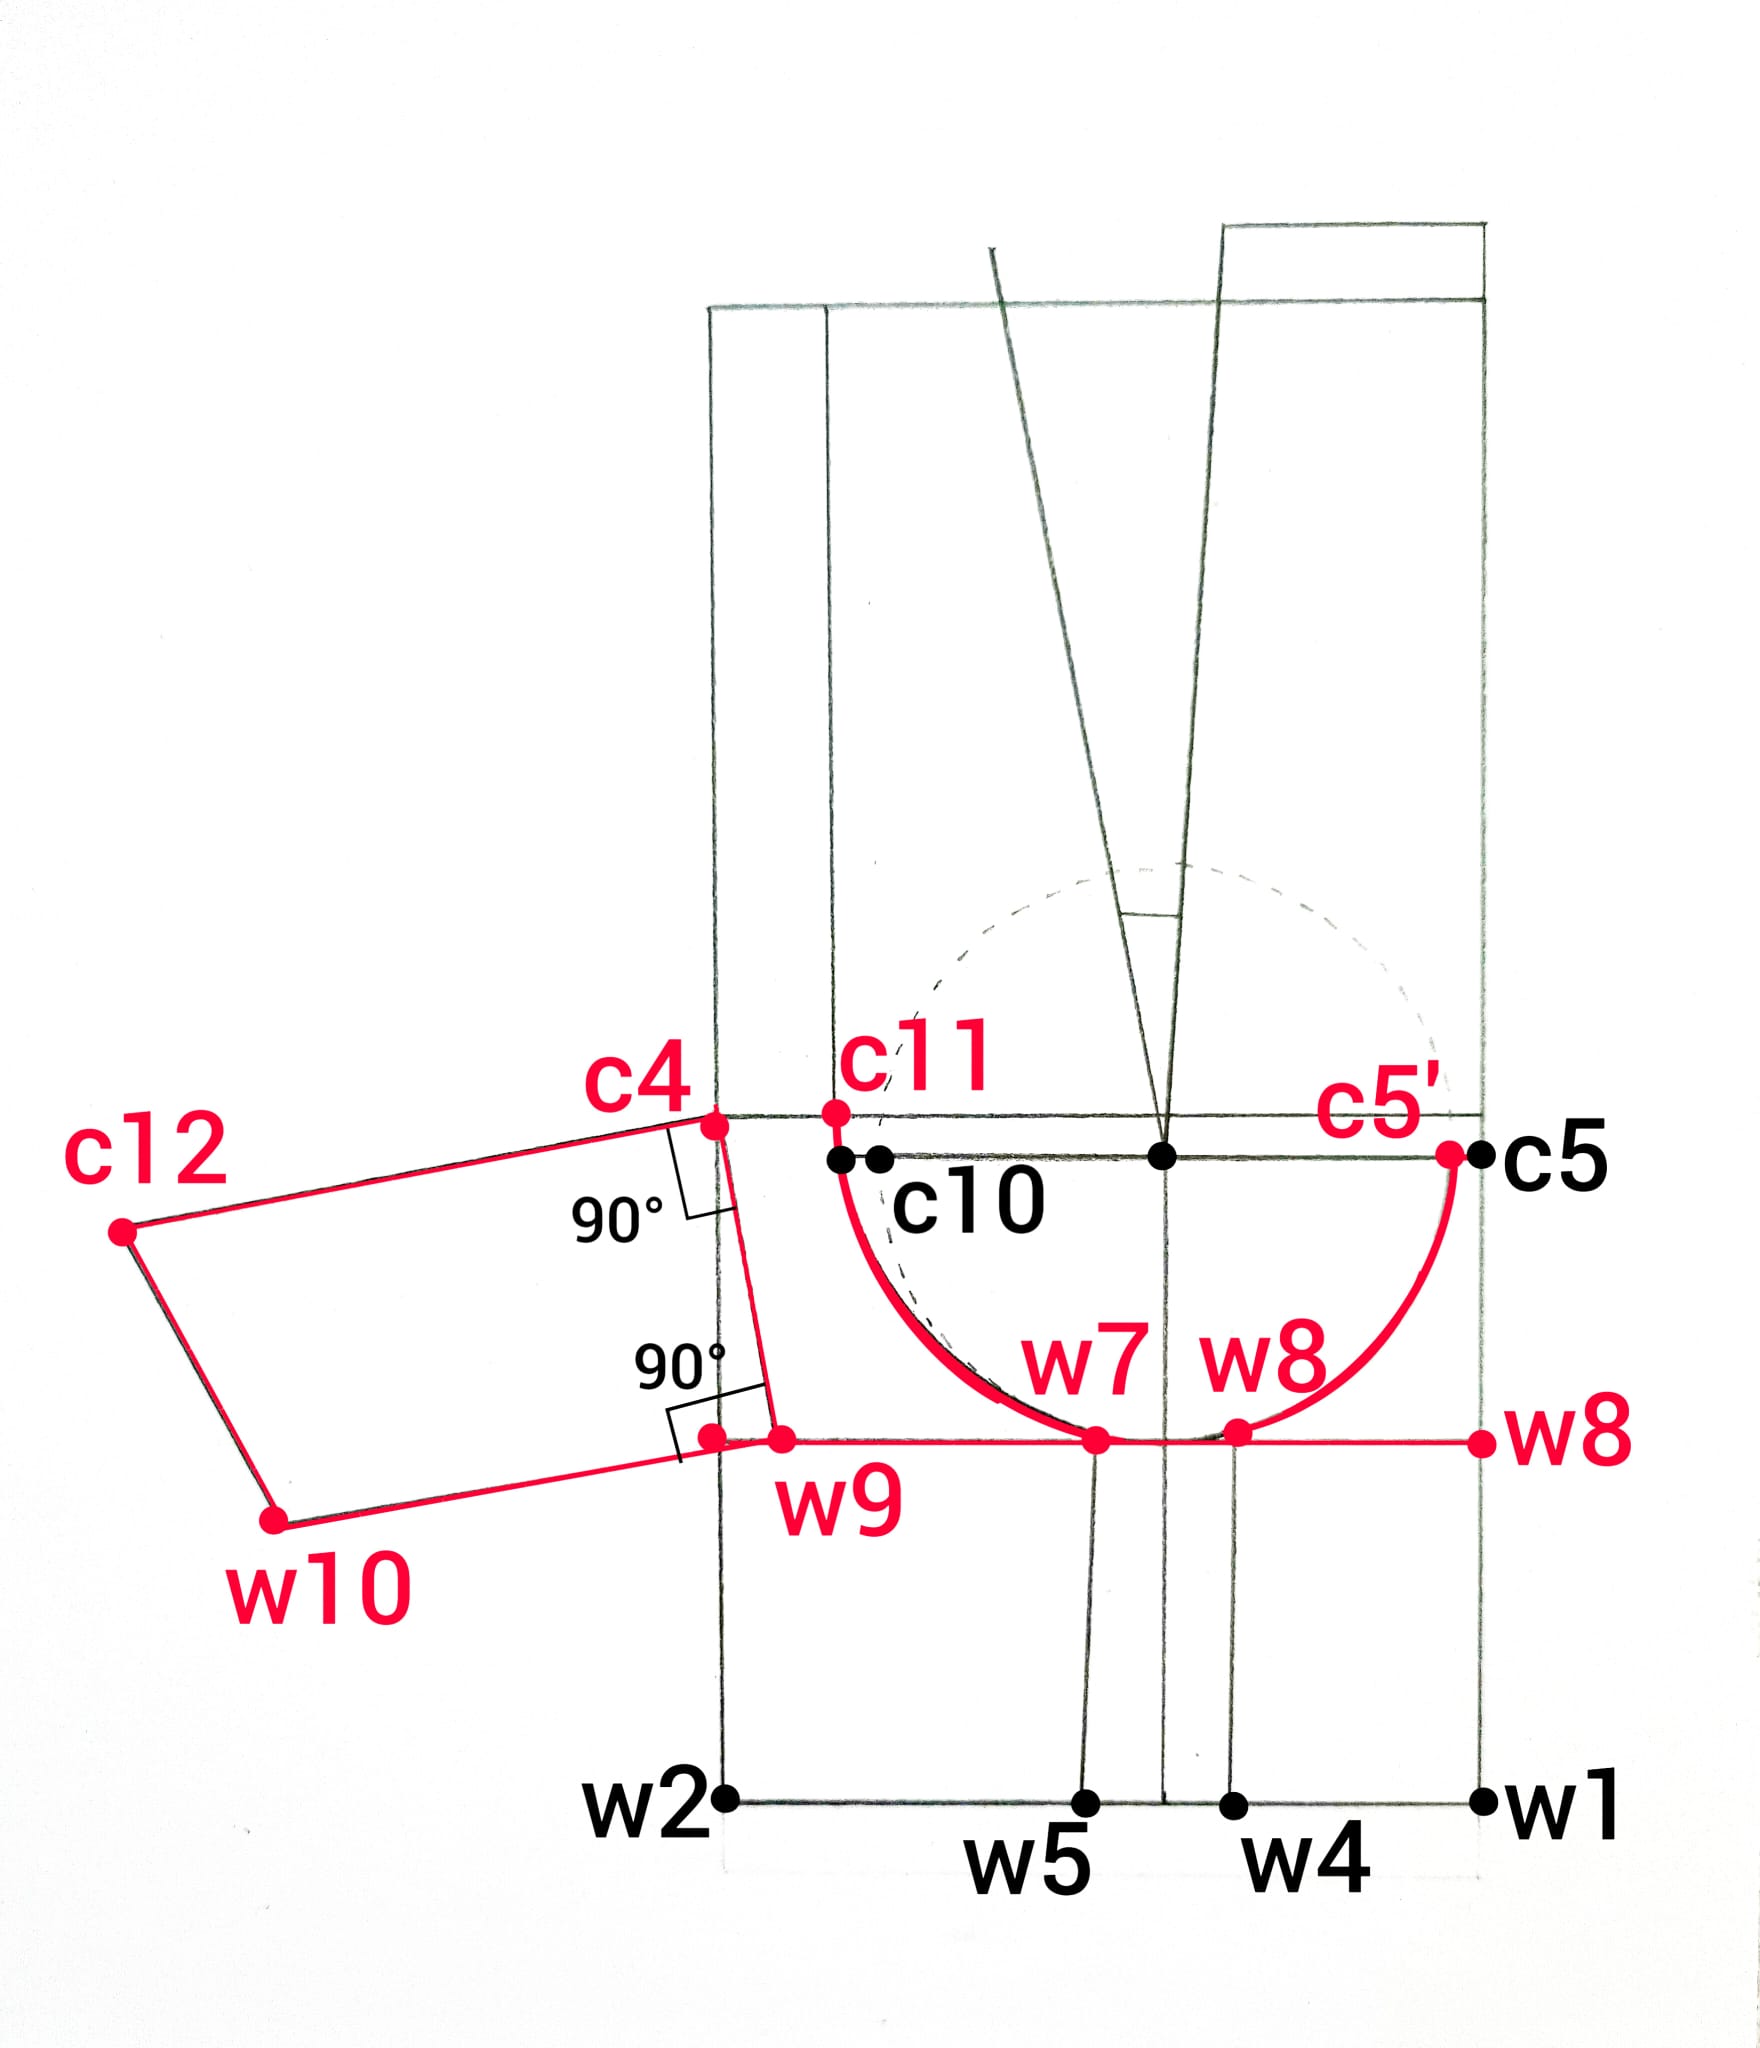
c10-c11 = from c10, move 1cm left and 1cm up, or as needed to hit c4 line
Join c11 to w7 with a soft curve a little more open than the circle.
Draw underbust line as a parallel to waistline that passes through w6 and w7, then label w8 the point where underbust line hits center front.
Along underbust line, measure from w8 as underbust circ/4 (make sure to skip dart) and find point w9
c4-w9 is side seam.
Now draw two lines both perpendicular to side seam towards left
c4-c12 = (bust circ/4)*k
w9-w10 = (underbust circ/4)*k
Join point c12-w10: this is center back.
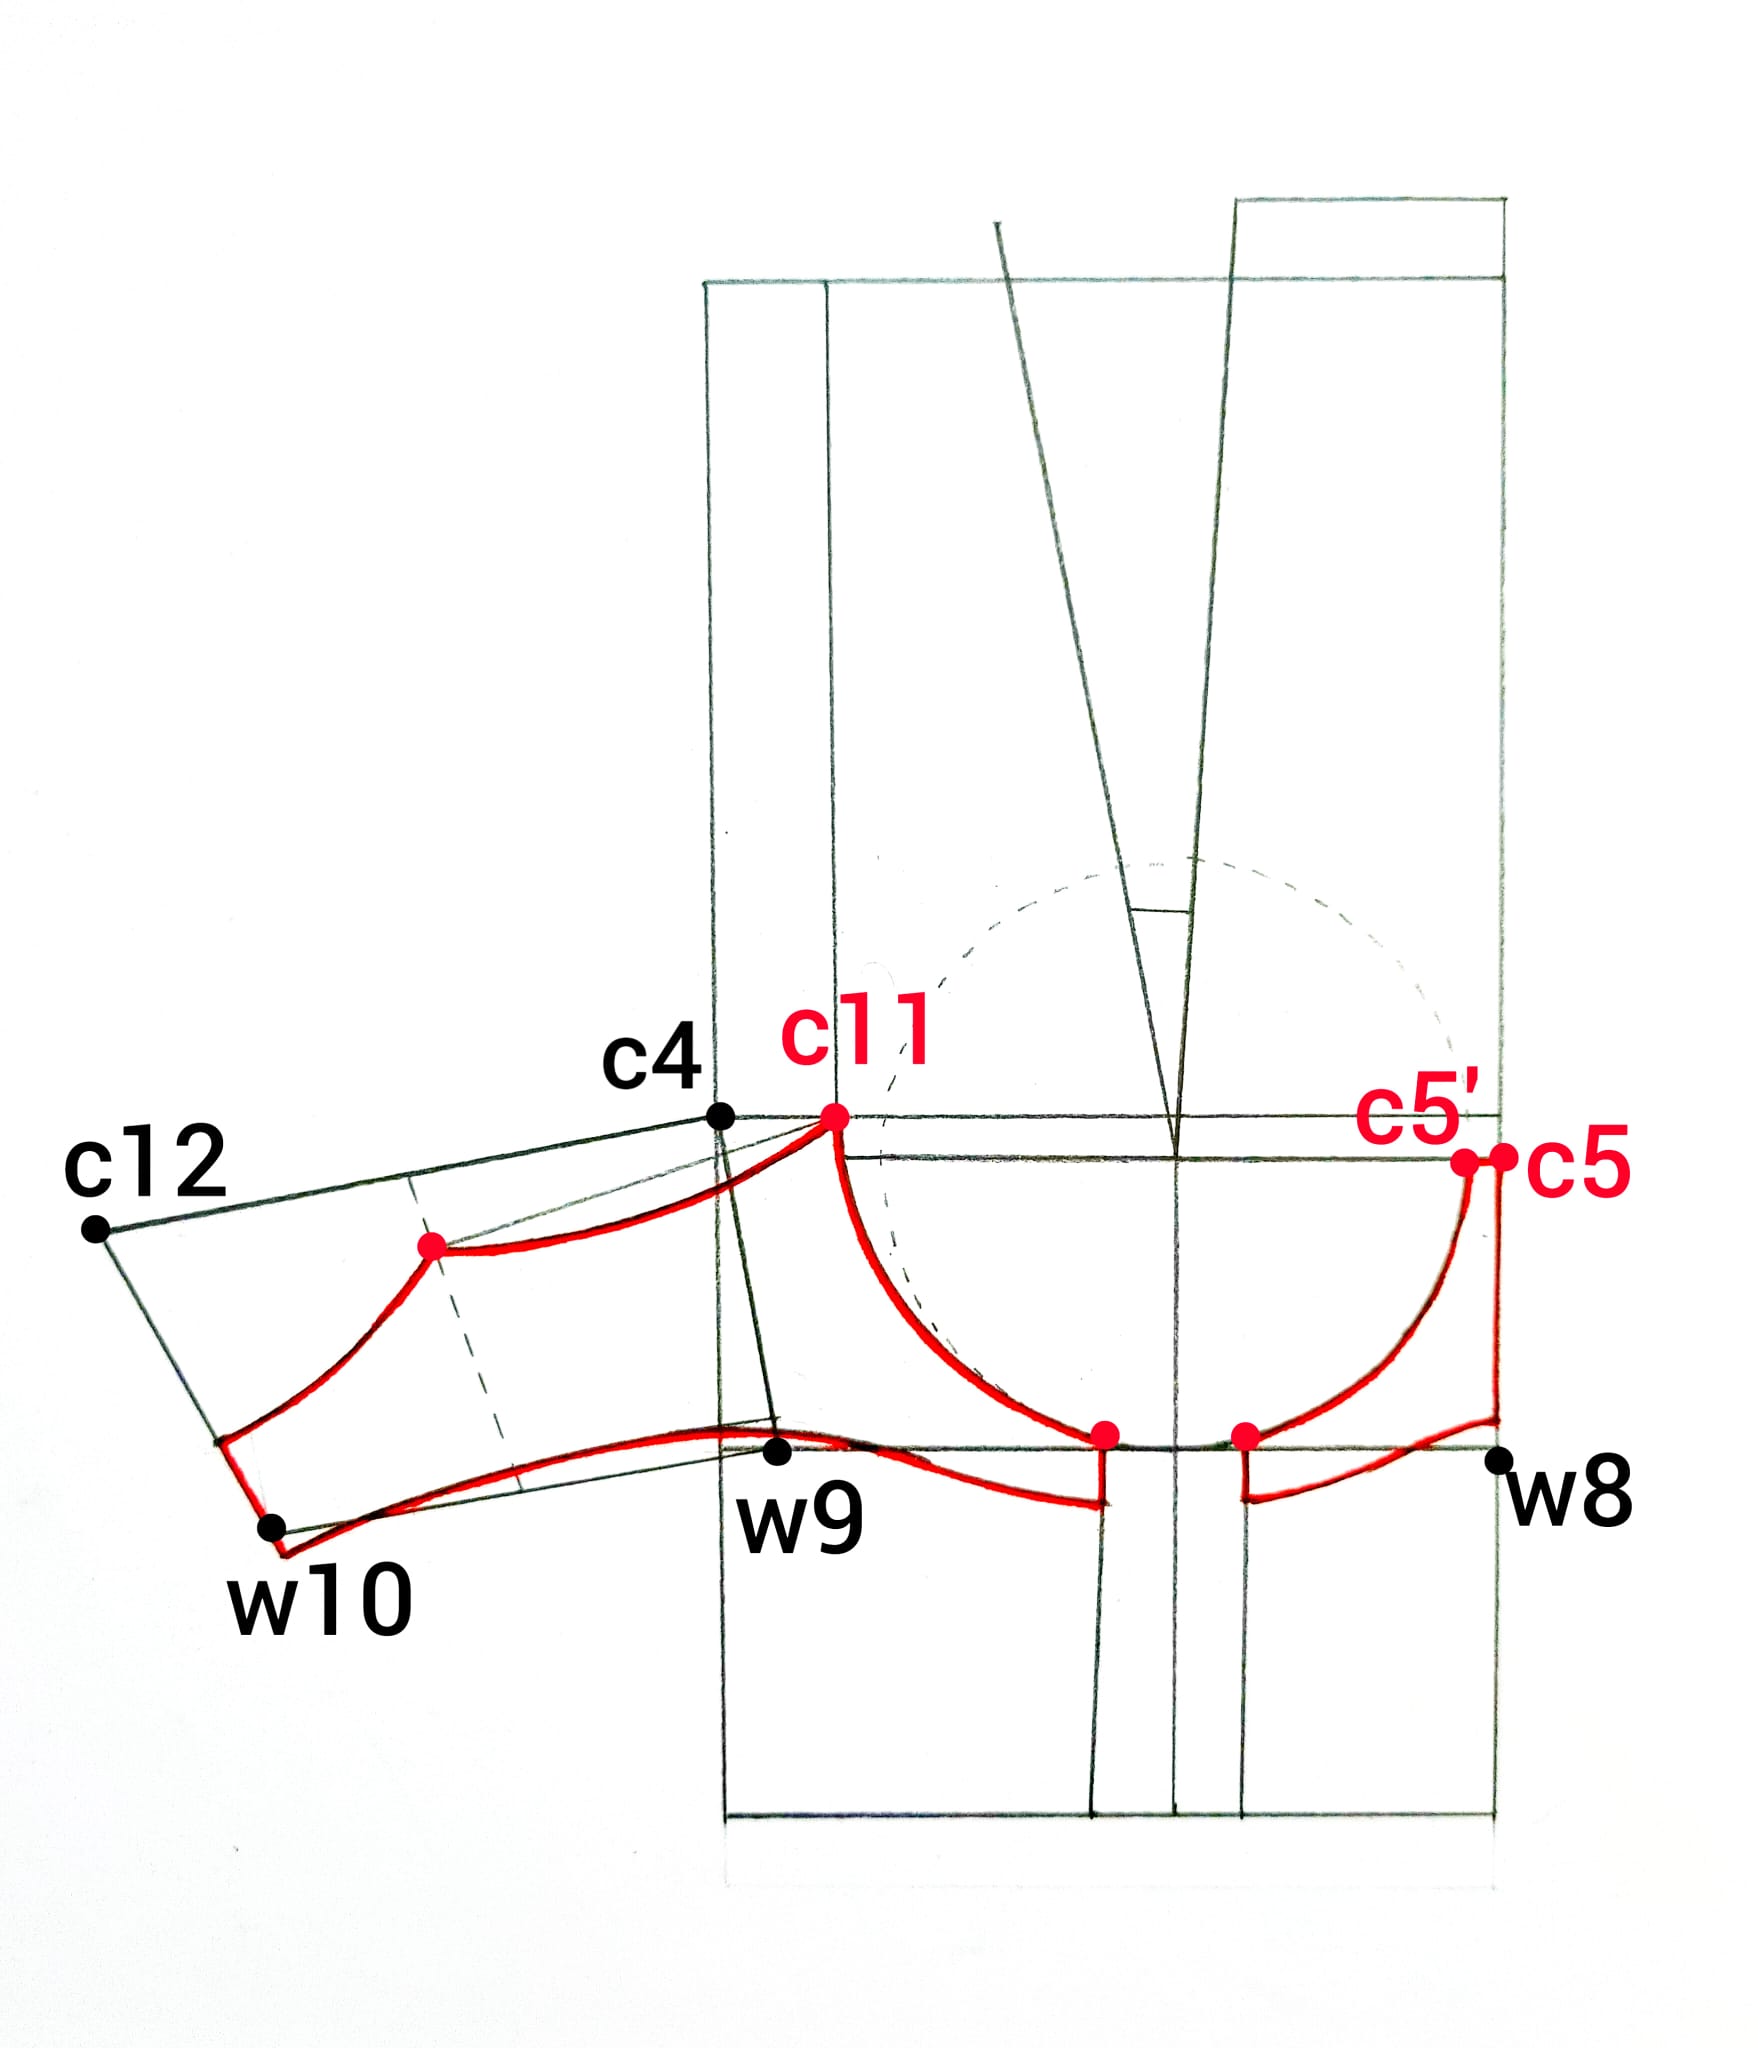
Bridge and band shape
You can draw different band shapes according the style you prefer. For a basic one:
- drop 1,5cm from w6 and w7
- raise 1cm from w8 salire di 1cm
- raise 0,5 to 1cm along side seam from w9
Join the new points with a curve as shown.
Raise from w10 as the measurement of the closure you will use.
To find shoulder strap position on back, divide upper and lower back segments in half
c12-c4/2 and w10-w9/2
and join the points with a straight line.
Draw the perpendicular from c11 to shoulder strap line.
Shape back bra as shown, with a little point where shoulder strap is.
Trace front and back band separate spitting them at c4-w9 line, then trace front bridge too.
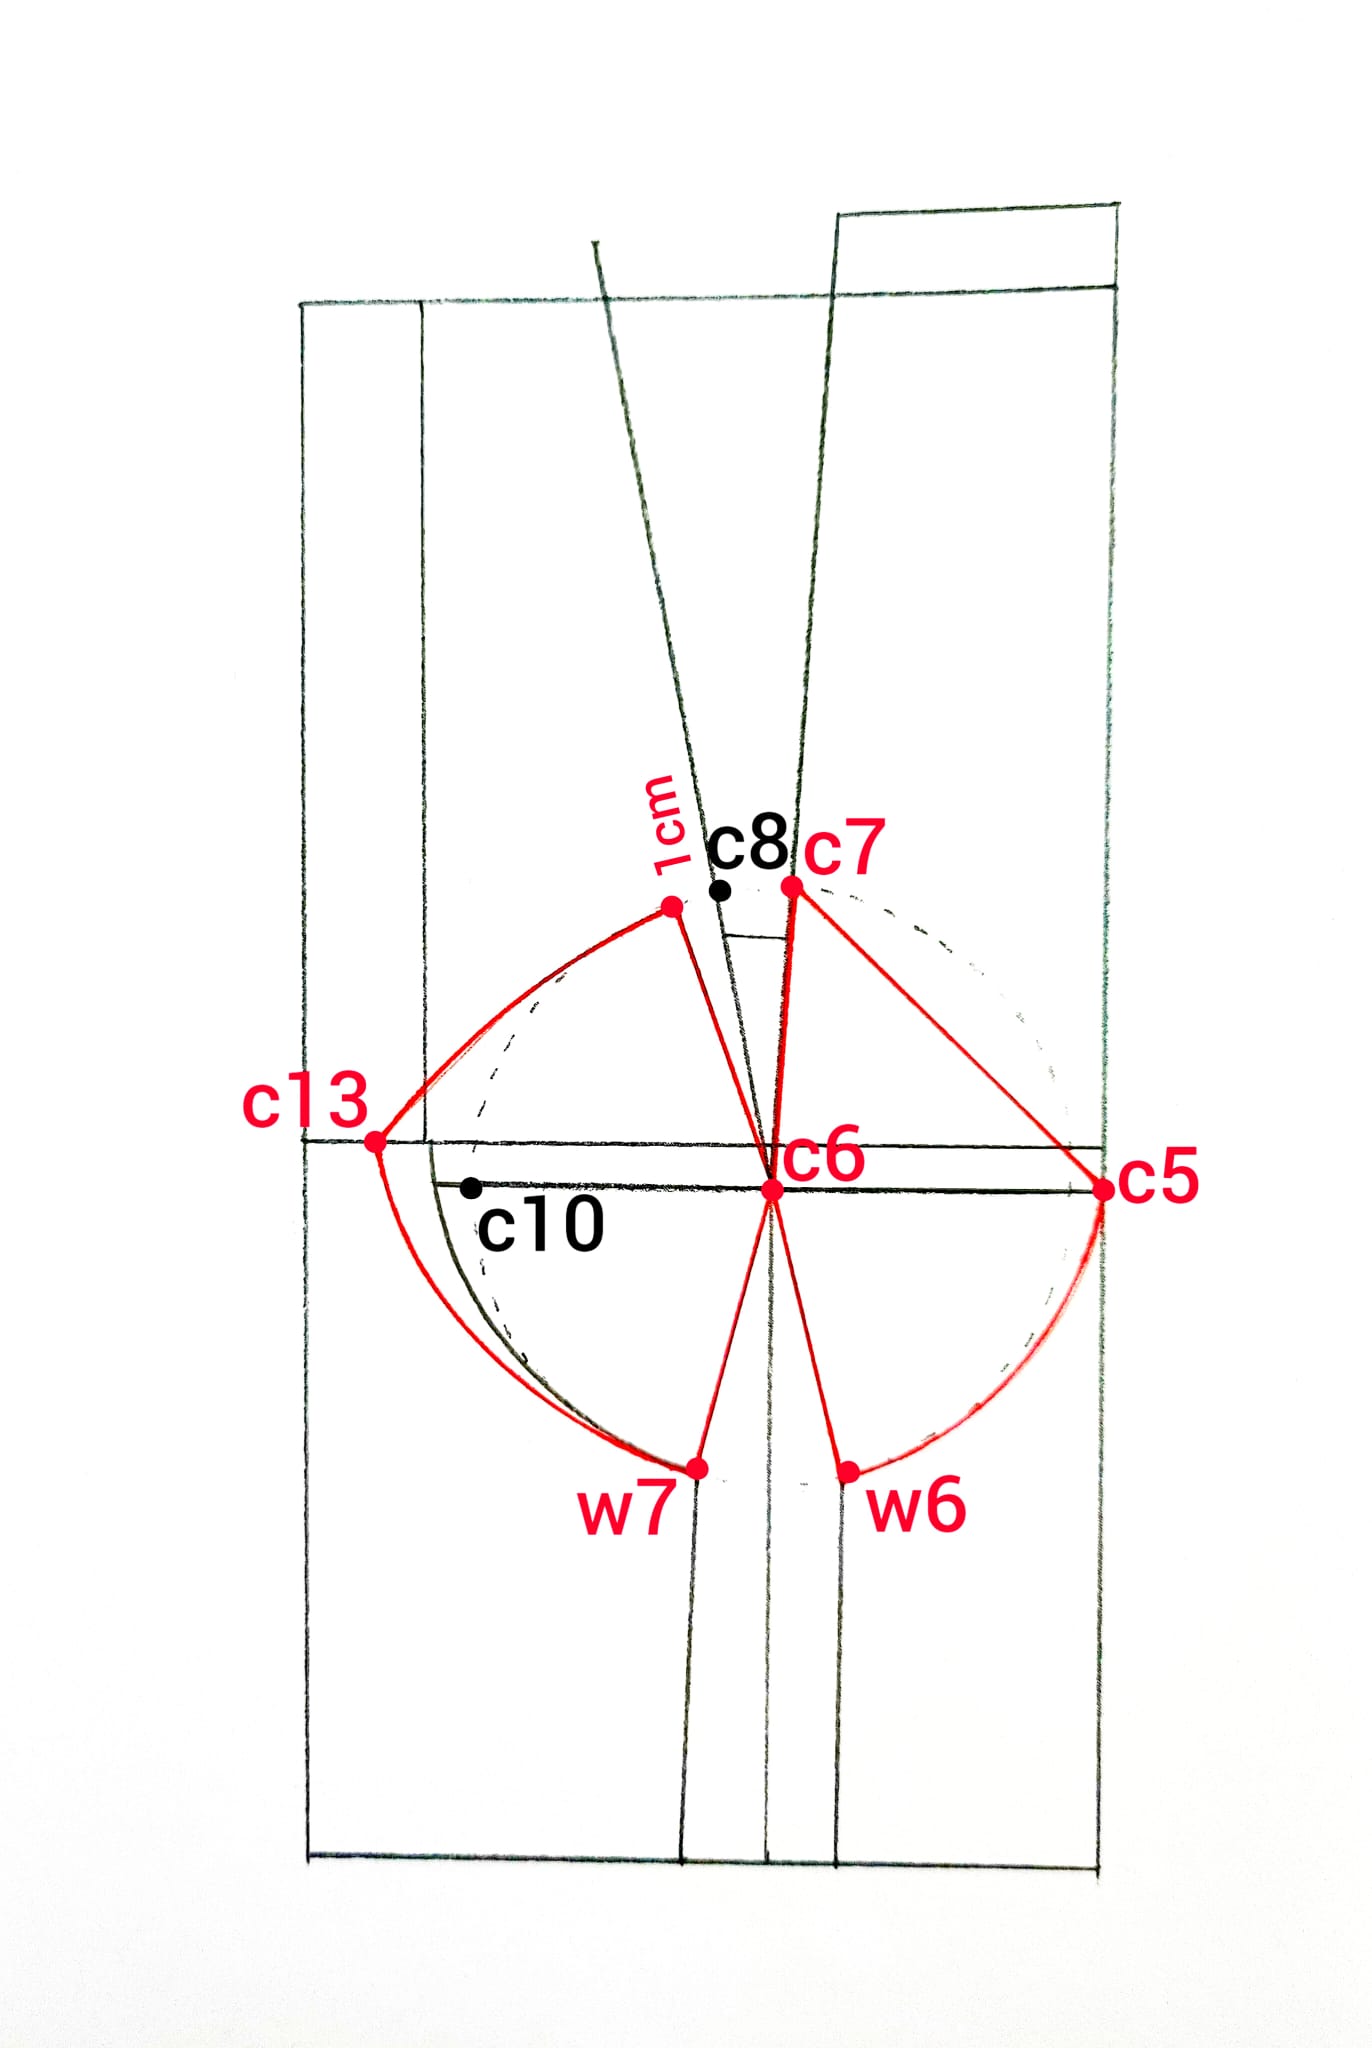
Cup
Trace a separate copy of front and work on it to create the cup. We suggest a copy because the pattern can easily become too crowded with lines and letters 😉
c11-c13 = 1,5cm
Join point c13 to w7 with a curve.
Widen shoulder dart by 1cm on the left of point c8.
Join points c7 to c5, the one 1cm past c8 to c13.
Trace the two cup pieces separately marking c6 (bust point) with a notch.
Pattern pieces
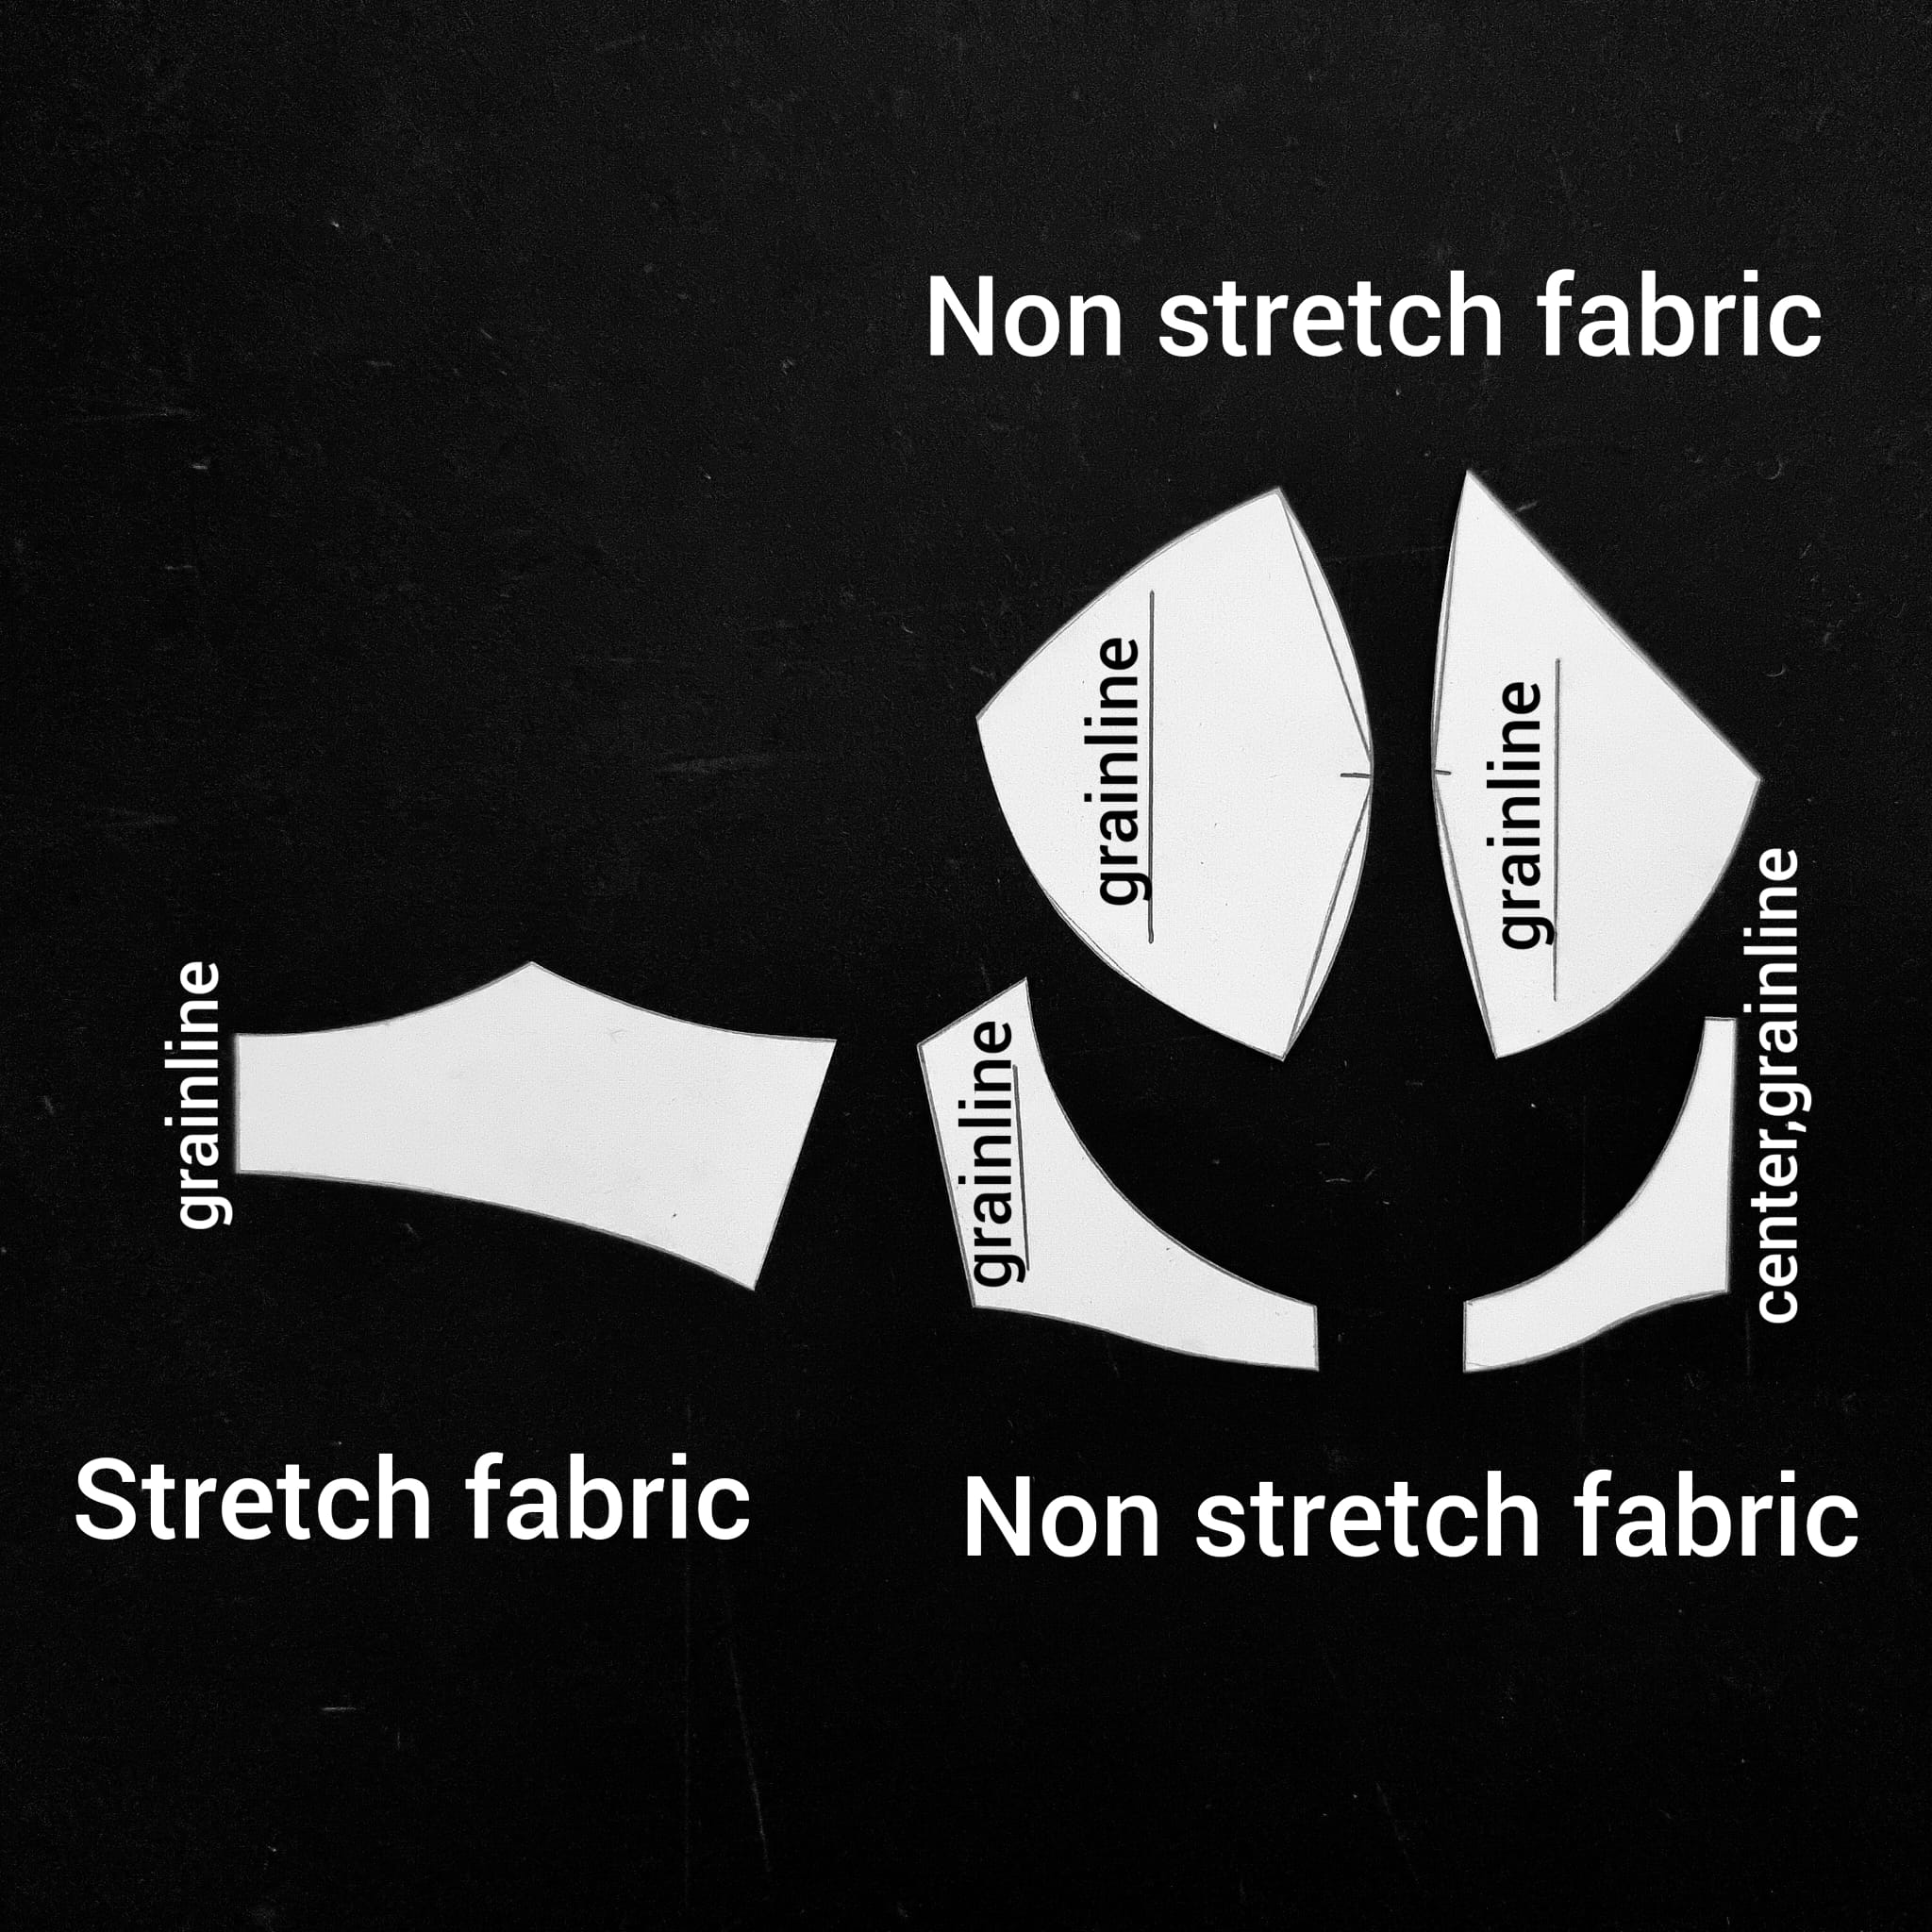
So, these are your bra pieces:
- 2 cup pieces, cut in non stretch fabric (for fitting) and – if you want – in foam fabric
- front band and bridge, cut in non stretch fabric
- back band, cut in stretch fabric.
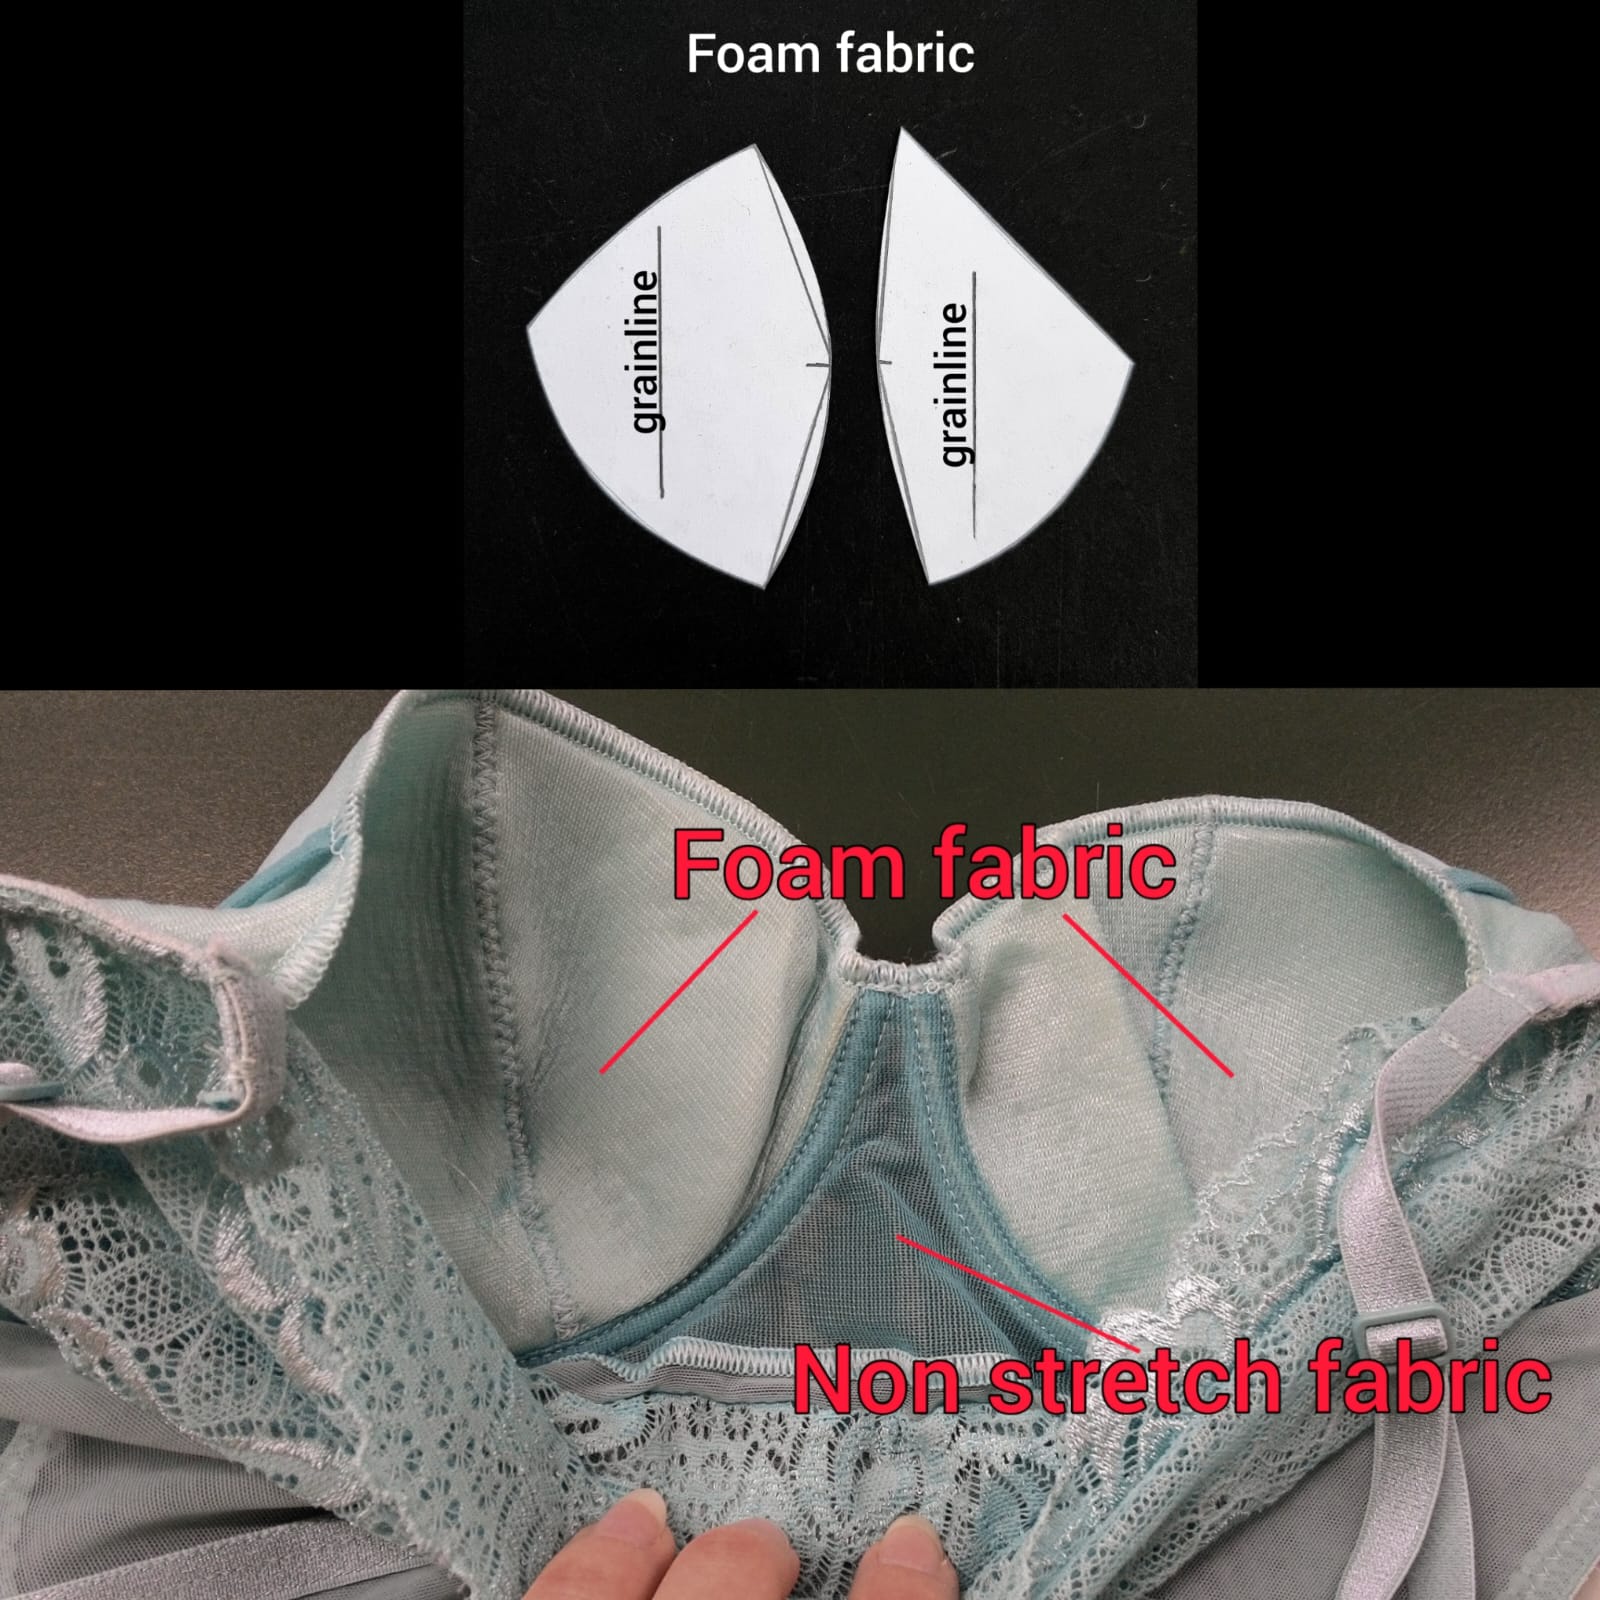
Foam pieces
If you sew cups in foam fabric, we suggest cutting them with zero seam allowance and sewing them with zig zag stitches as shown in the photo.
See the link at the bottom of this lesson for a video on us sewing a lace bra.
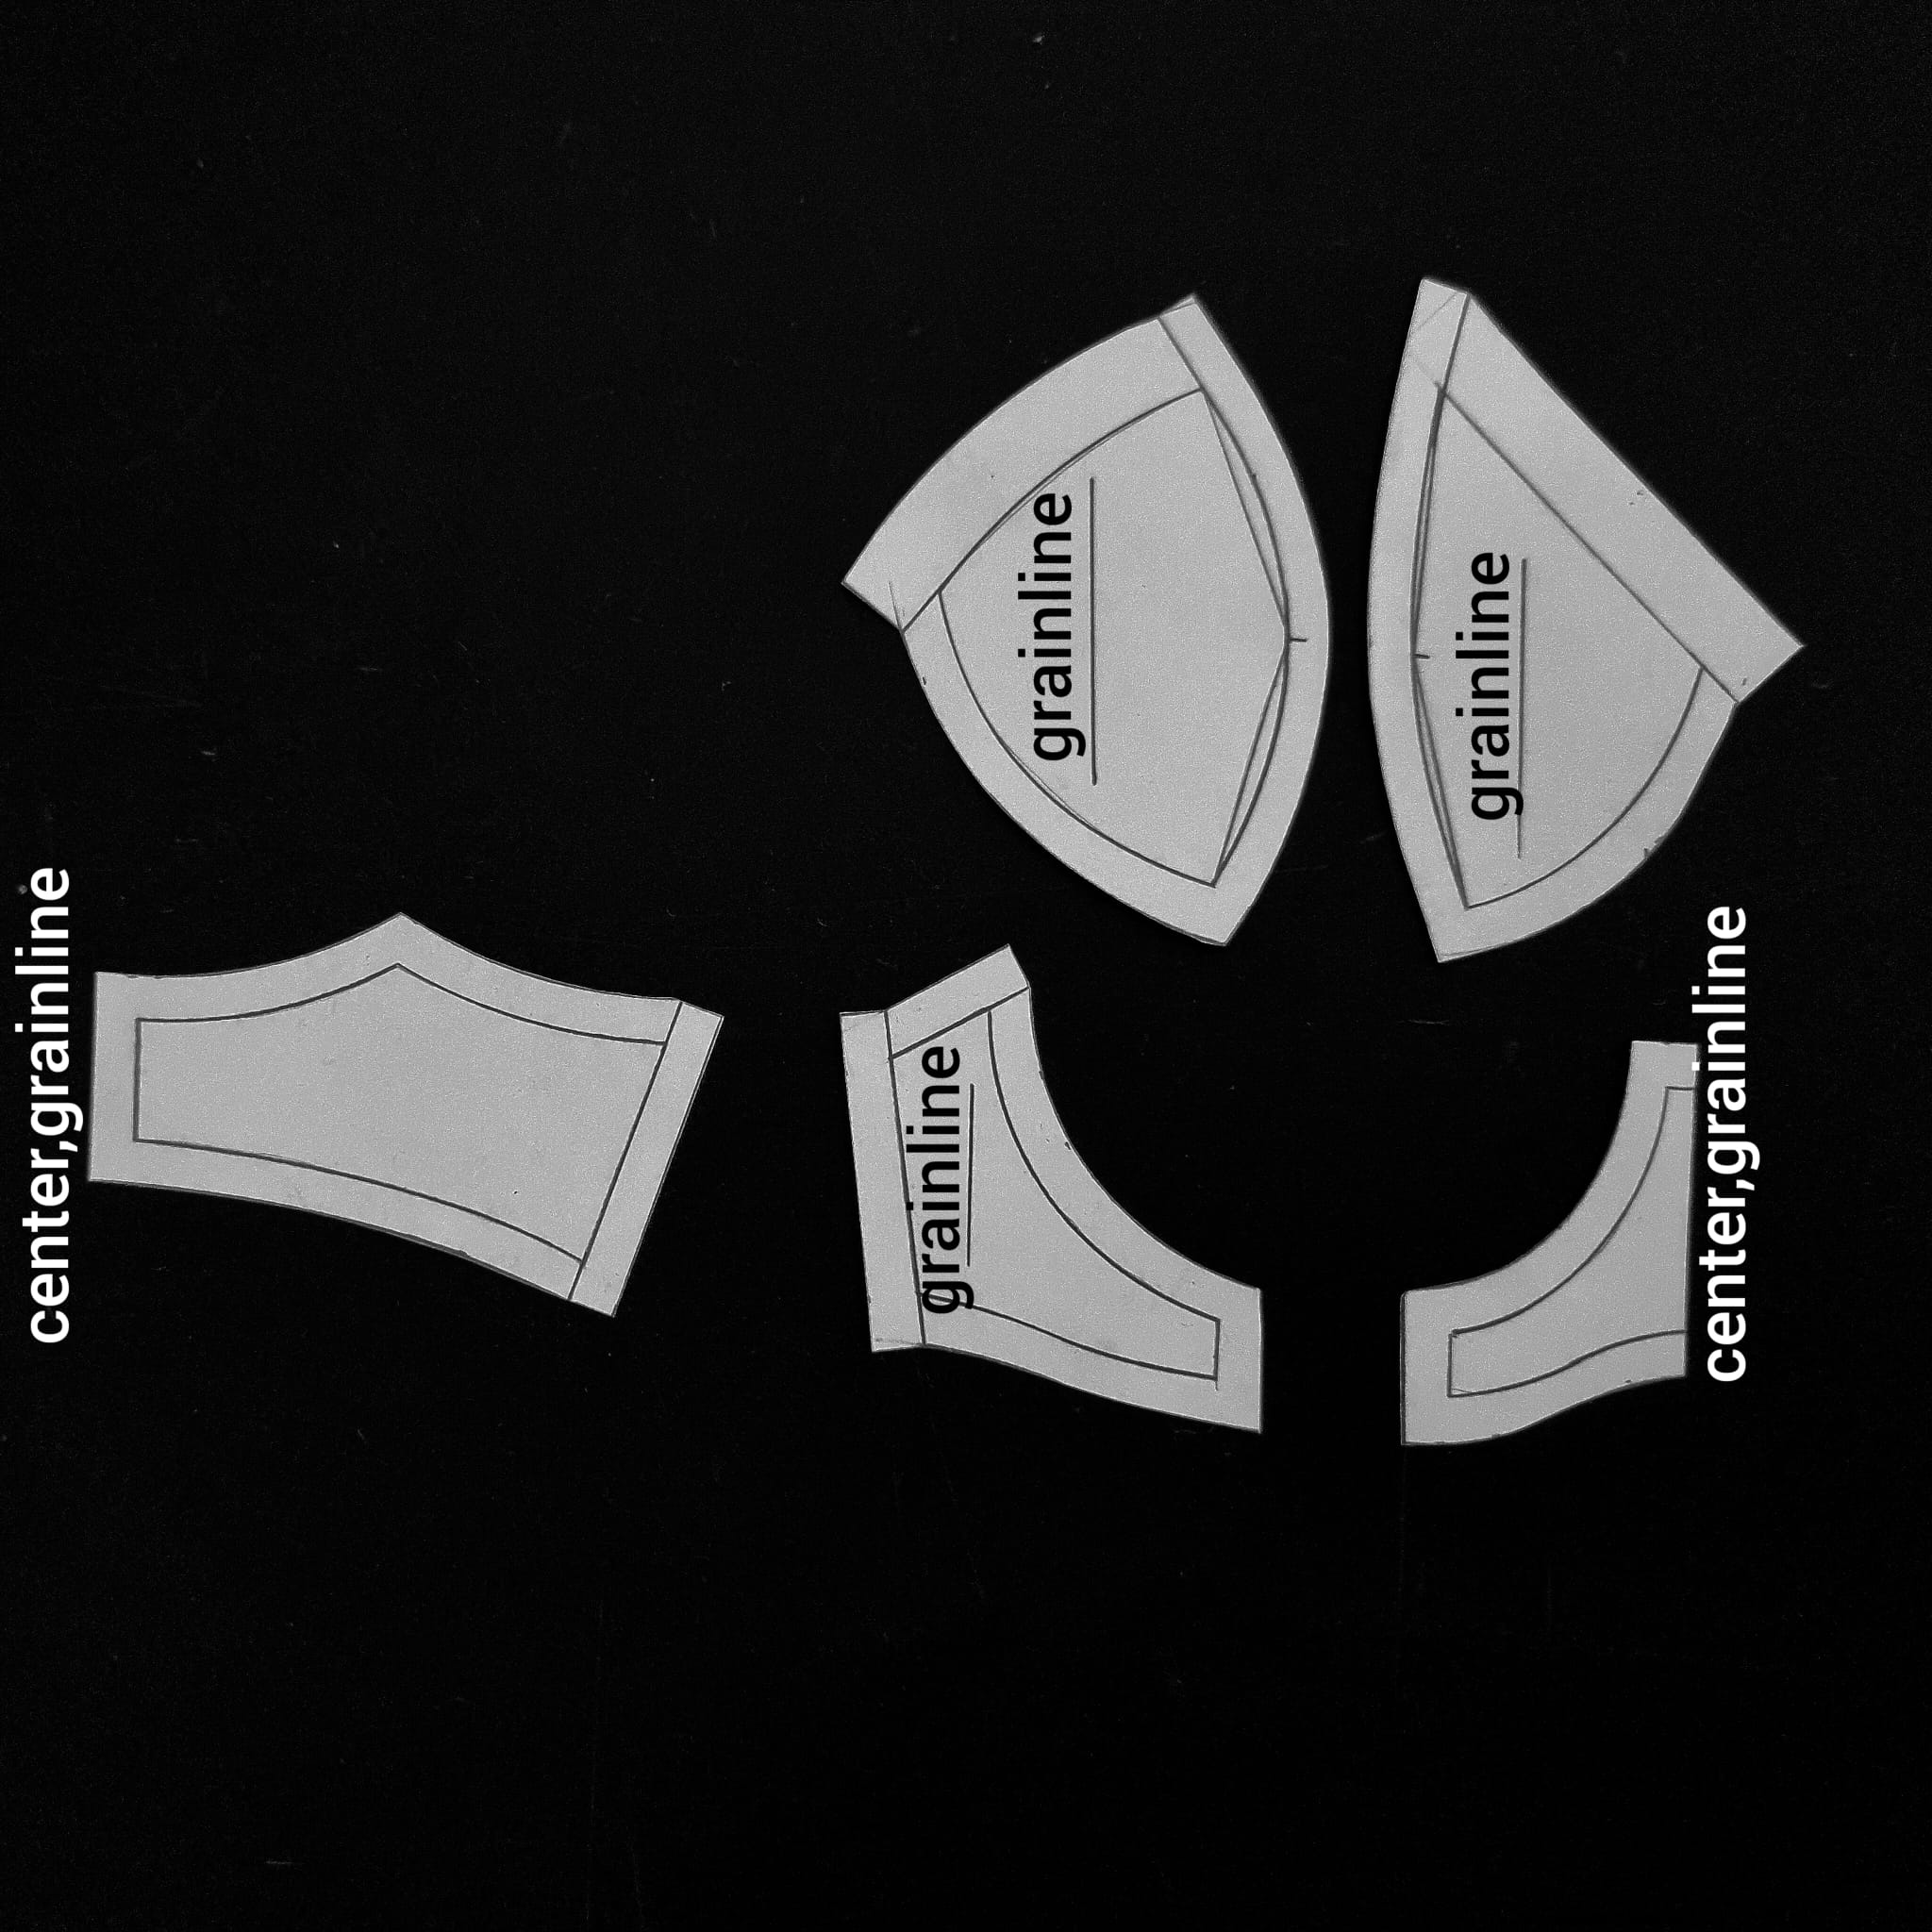
Final pattern
All other pieces need seam allowance – we suggest 1cm all around but 2cm at top cup.
Sew your mockup, and here below we have the most common fitting issues and their solutions.
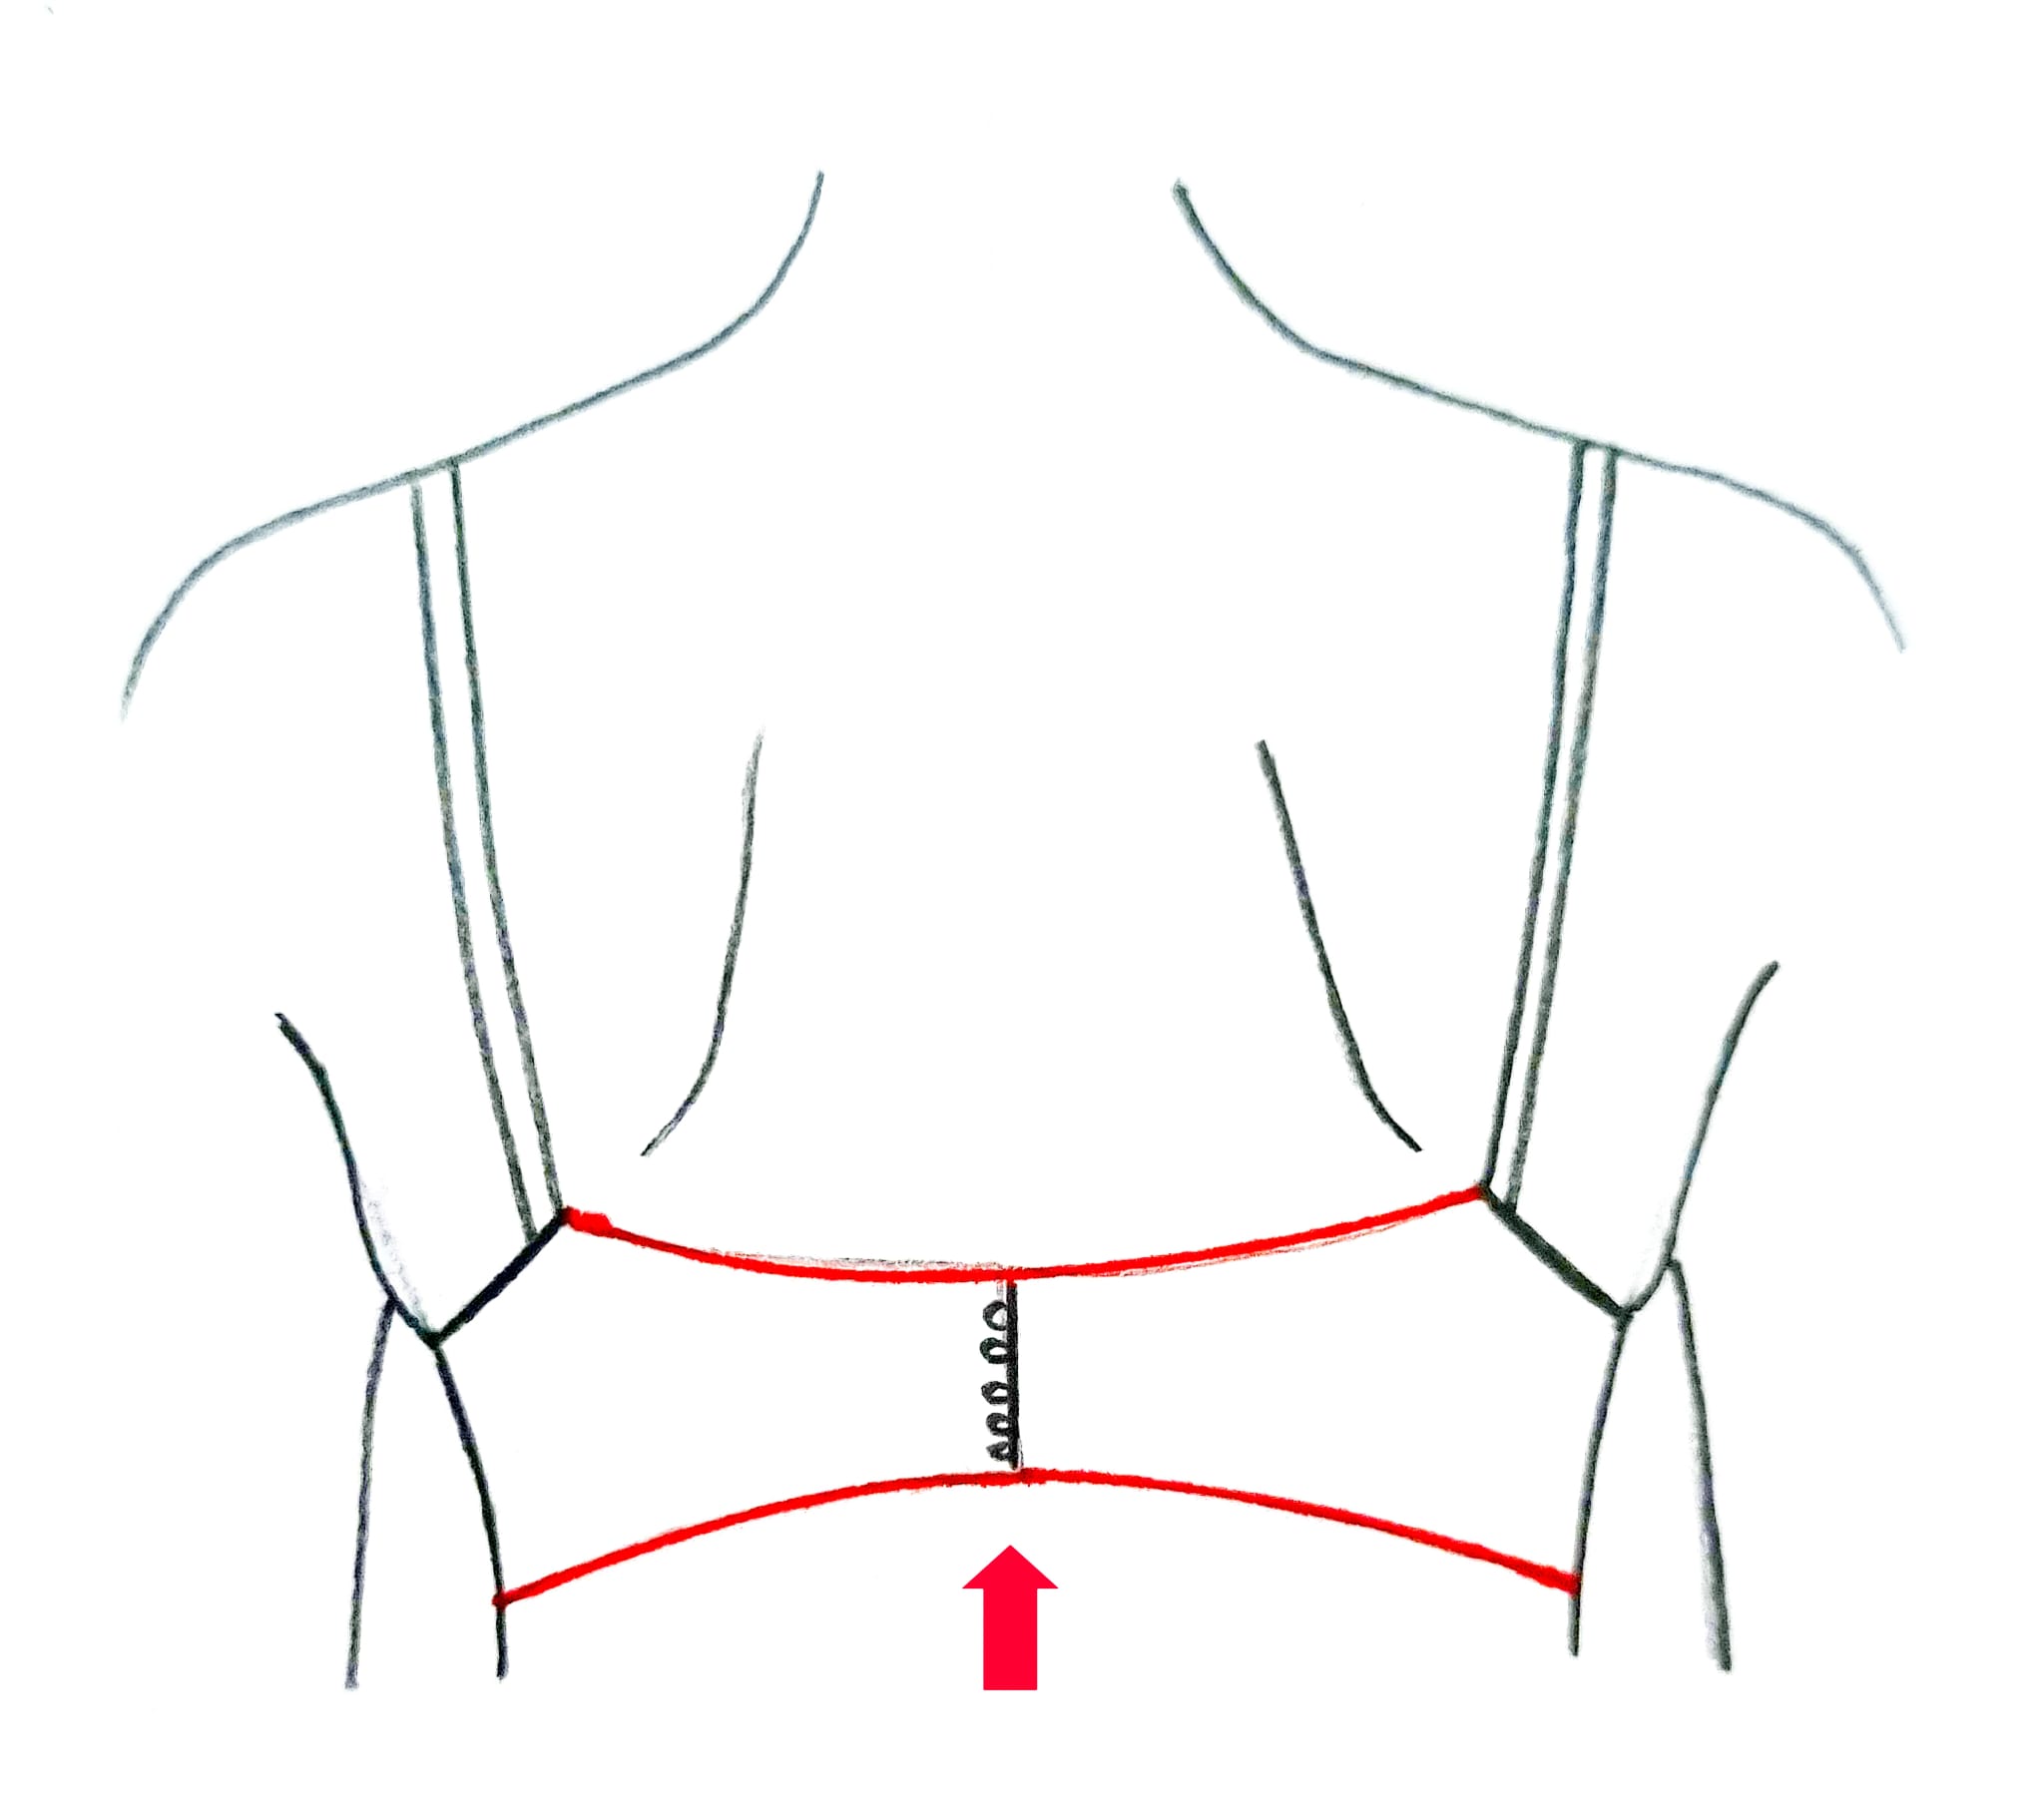
Fitting bras - back band raises
This is a quite common issue – also with ready to wear bras.
If back band raises in center back, it means:
- band is loose: reduce its circumference taking from center back and/or side seams
- and shoulder straps are too short. Try lengthening them after reducing band.
Fitting bras - gaping cup/brige
If cups are not fitting to the breats, it means shoulder dart is not deep enoght.
Try pinning the excess of fabric creating a dart from neckline to bust point, then replicate that dart in paper and manipulate it into the slash lines you have.
If bridge is not fitting to body but is gaping away, there are 2 possible causes:
- either the cup is not deep enough (see next adjustment for the solution)
- or the underbust band is too tight. In this case, widen the band from side seams or center back.
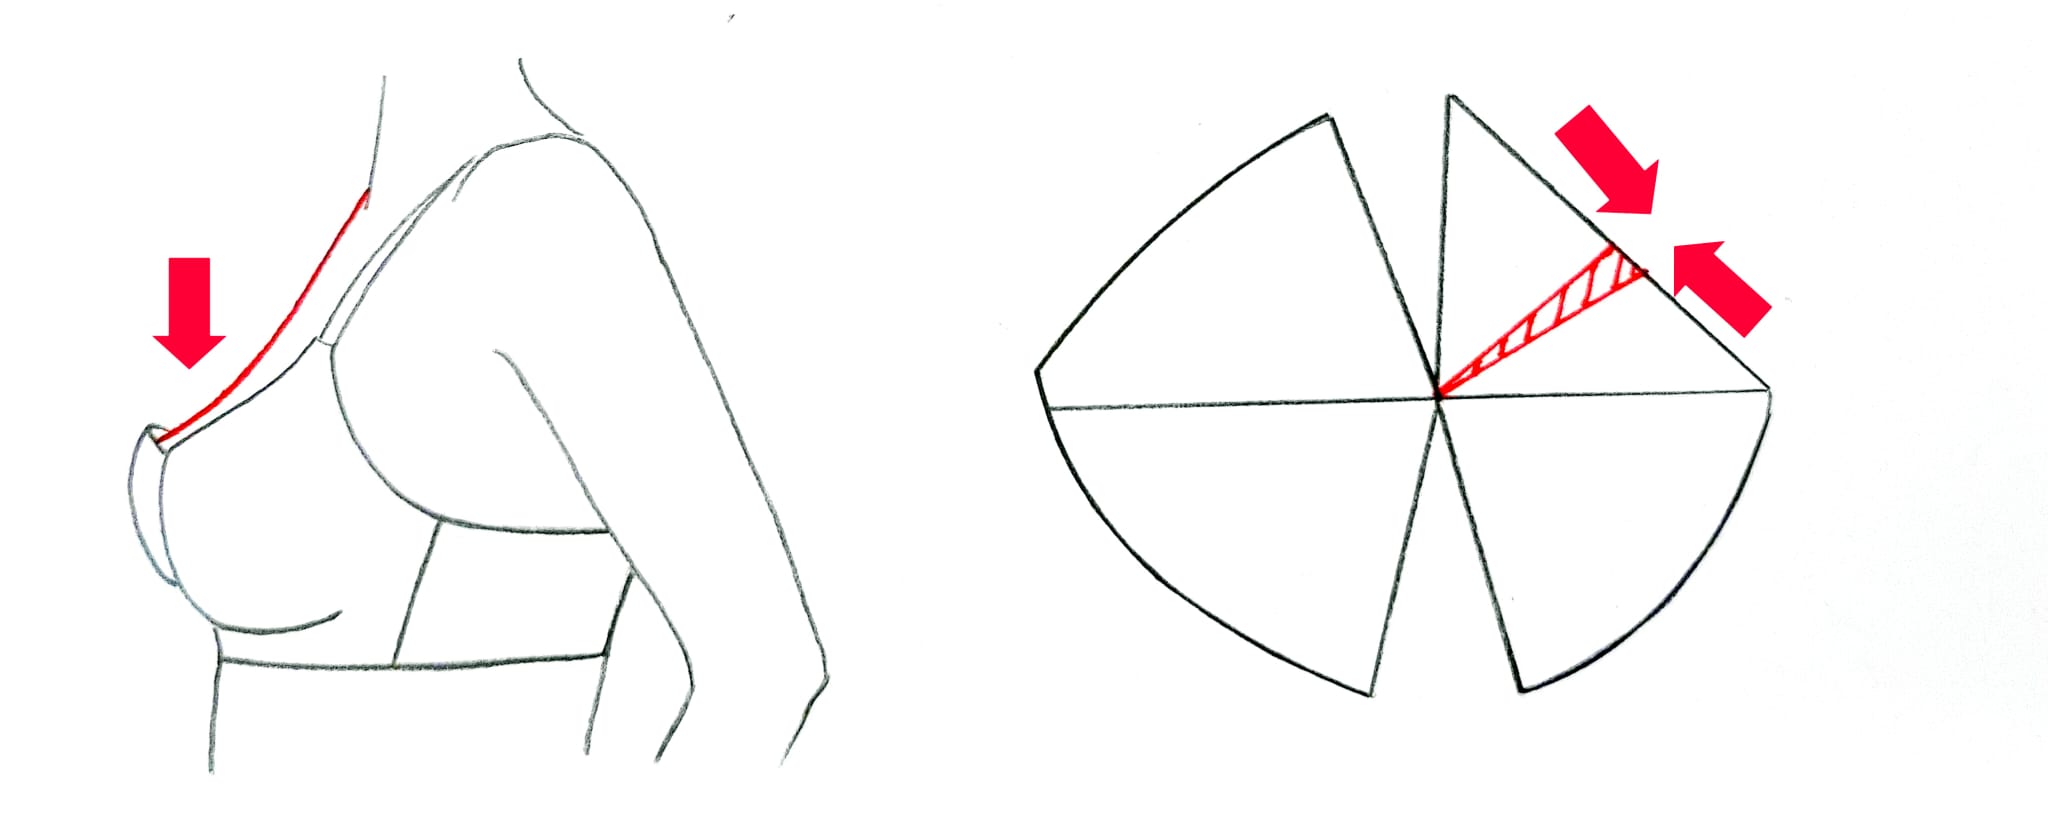
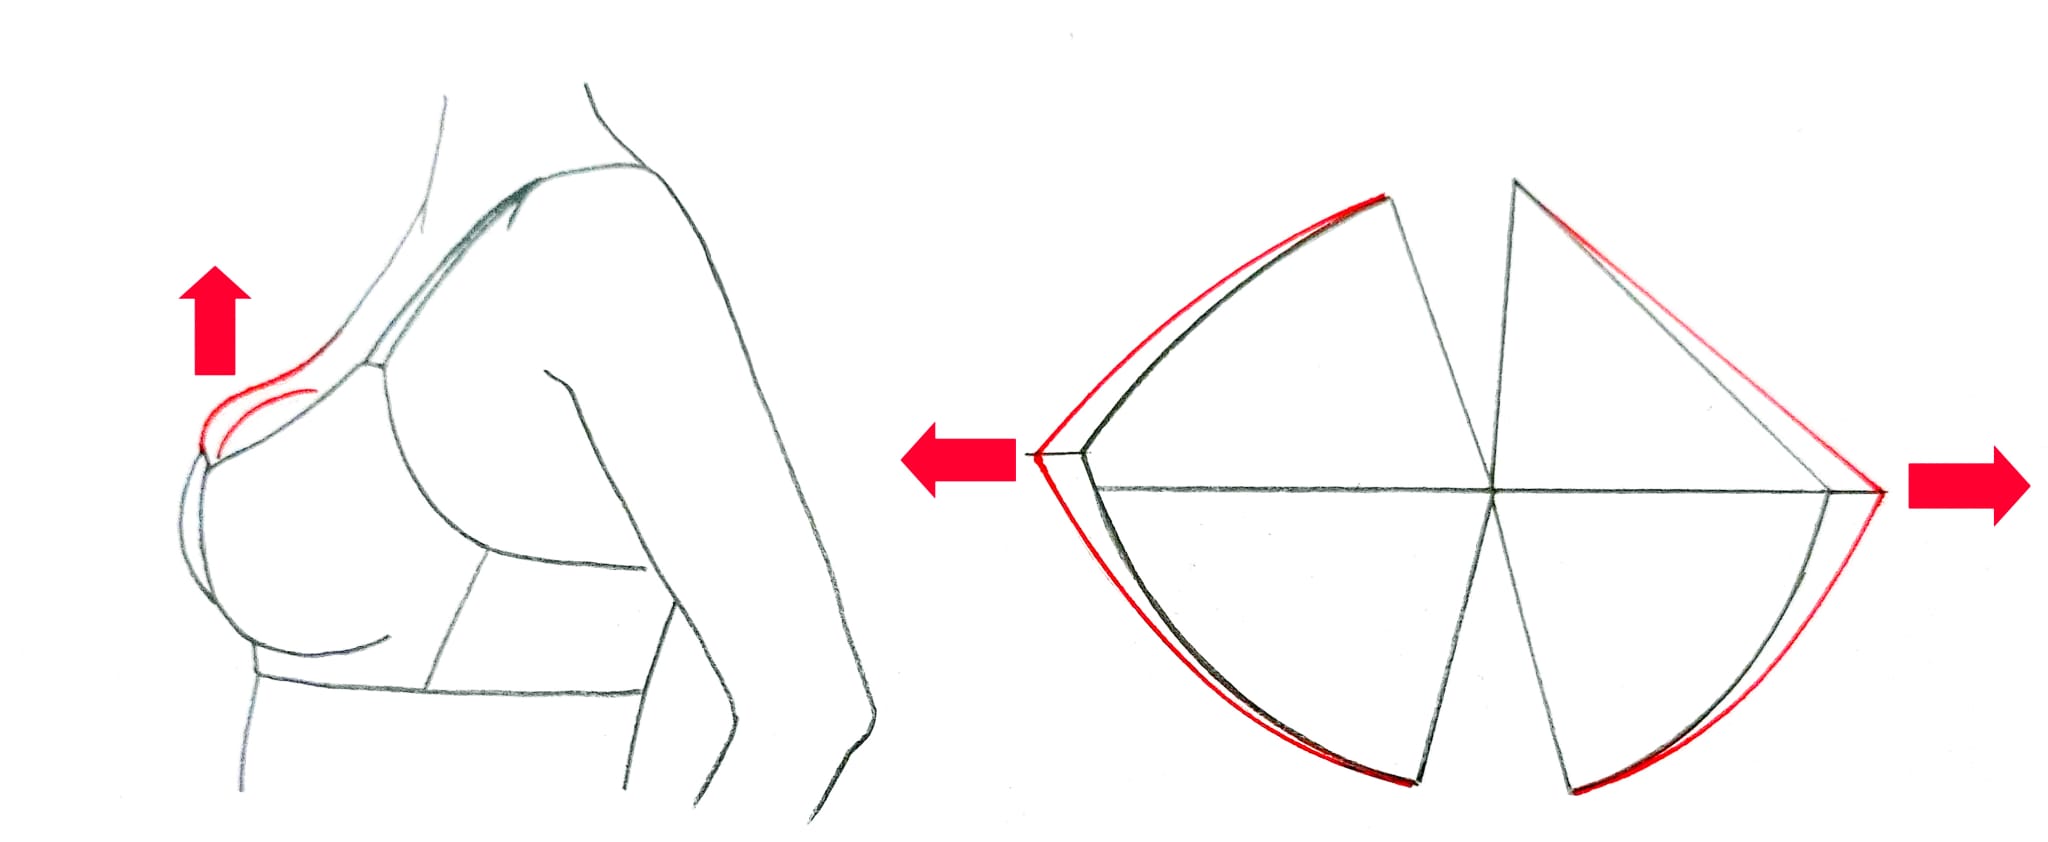
Fitting bras - cup or underwire are tight
If cup is too small, breasts don’t fit nicely in it and/or front bridge gapes from bosy.
Rip the cup from center and side and see how many cm are missing, then redraw a wider cup.
If wire is too tight, check it with breast shape and try changing it.
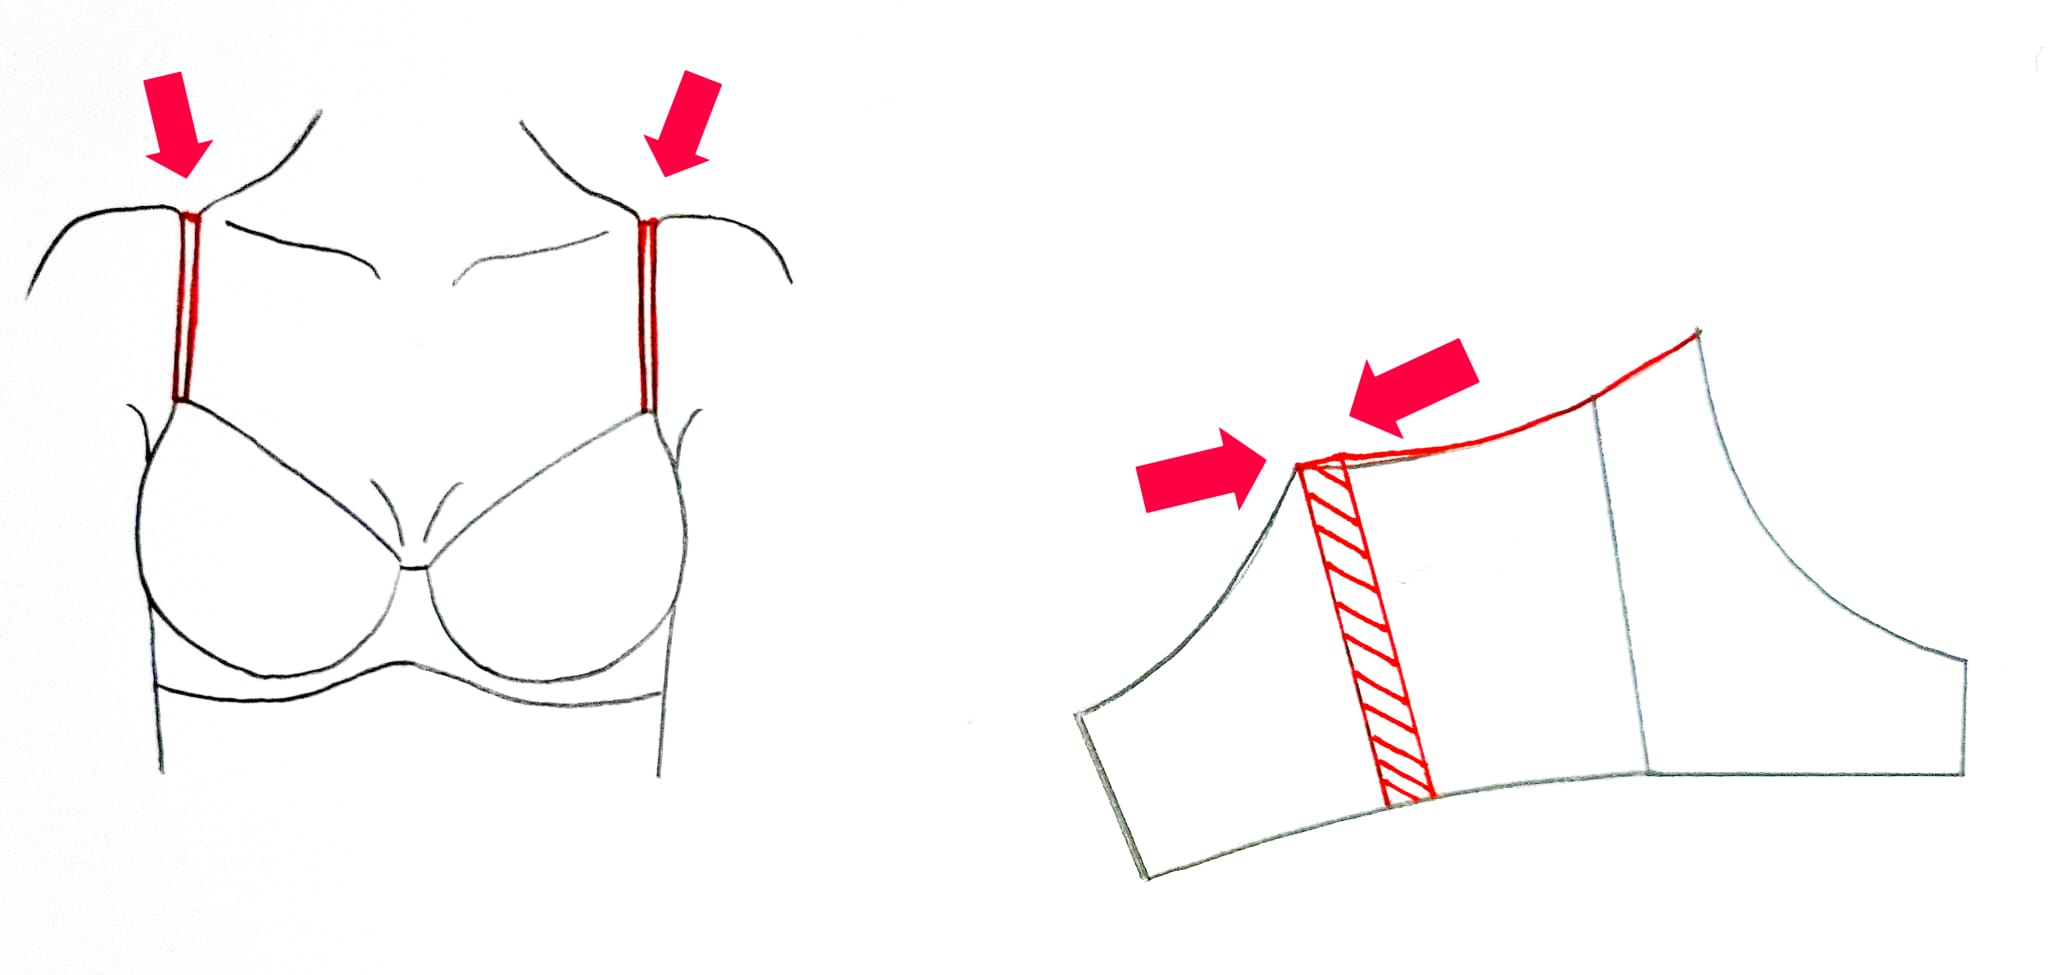
Fitting bras - straps dig in shoulders
If straps dig in the shoulder (especially for fuller breasts) it means the band is not tight enough and all the breasts weight is carried by the straps.
Try reducing the band as shown.
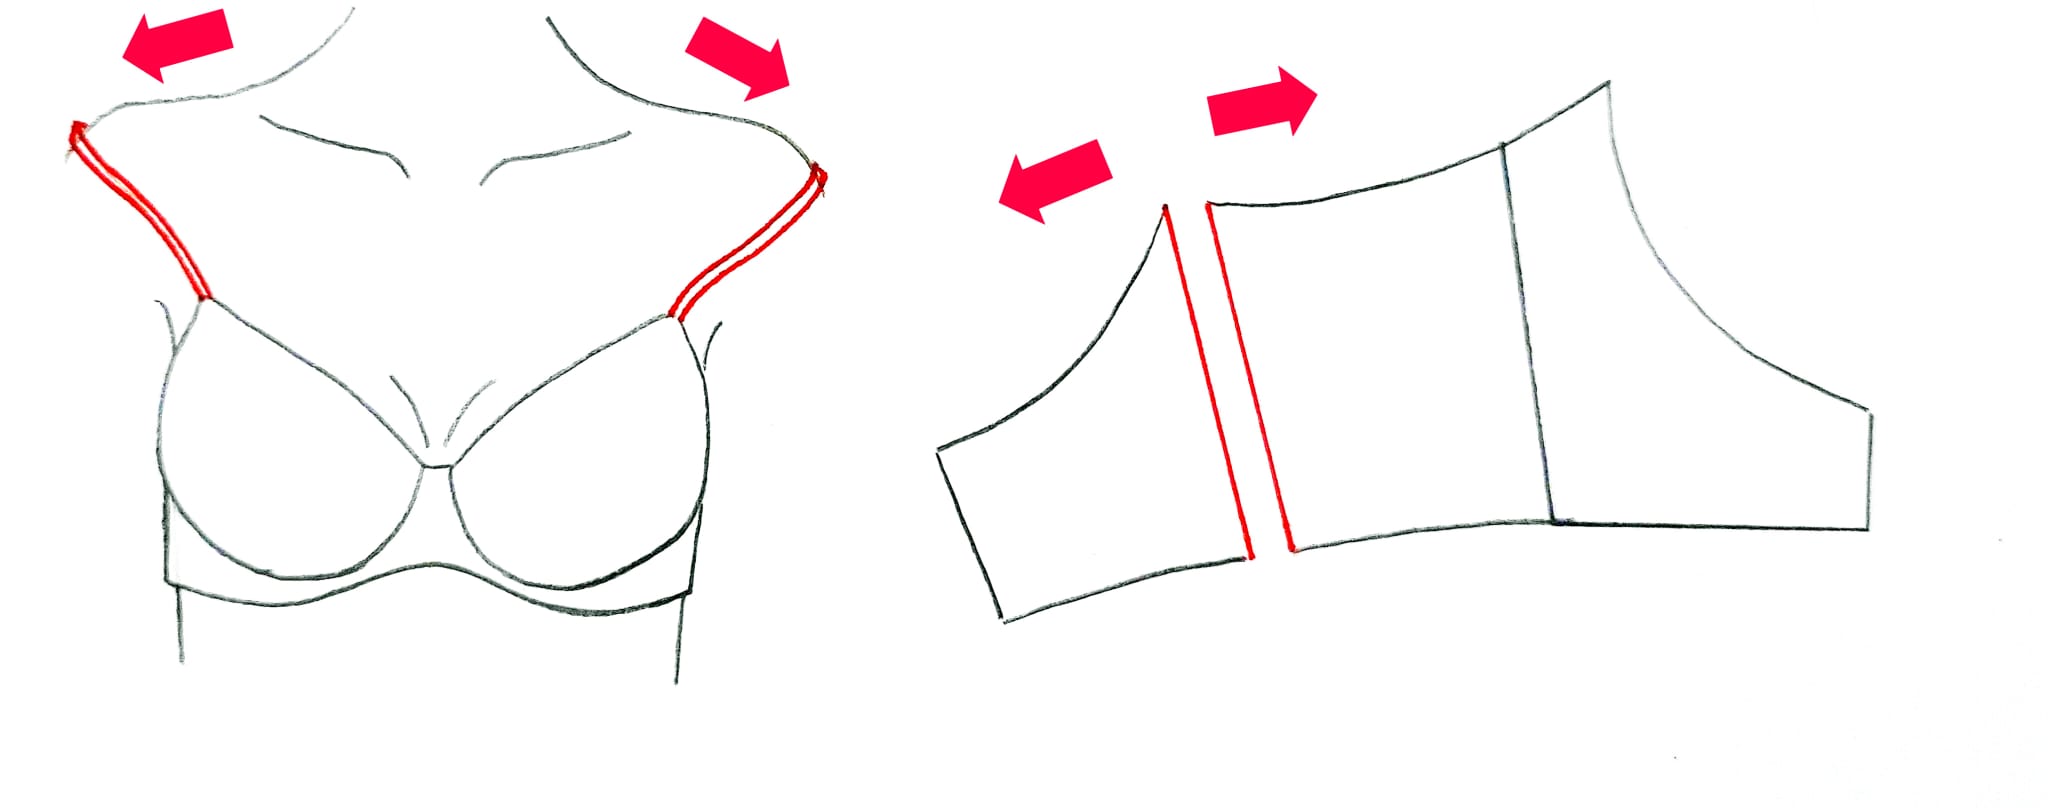
Fitting bras - straps fall down
If straps fall down, first check if you need to shorten them.
If you have regular shoulders, check band measurement – it might be too tight causing straps to fall.
If you have narrow shoulders, you might consider replacing shoulder strap position closer to center back or create bras that have straps that cross on back.